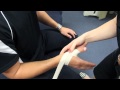
Thumb Taping Techniques and Guidelines
Interactive Video
•
Physical Ed, Life Skills, Health
•
6th - 10th Grade
•
Practice Problem
•
Hard

Emma Peterson
FREE Resource
Read more
5 questions
Show all answers
1.
MULTIPLE CHOICE QUESTION
30 sec • 1 pt
What is the initial hand position for the thumb taping technique?
Handshake position
Fist position
Thumbs up position
Palm up position
2.
MULTIPLE CHOICE QUESTION
30 sec • 1 pt
What is the target joint for the thumb taping technique?
Radiocarpal joint
Interphalangeal joint
Metacarpophalangeal joint (MTP)
Carpal joint
3.
MULTIPLE CHOICE QUESTION
30 sec • 1 pt
How many times should you loop the elastic adhesive bandage around the thumb?
Three times
Twice
Four times
Once
4.
MULTIPLE CHOICE QUESTION
30 sec • 1 pt
What should you do to avoid covering the whole thumb with the elastic hand tape?
Apply it only to the wrist
Use a wider tape
Pinch the tape around the web space
Wrap it loosely
5.
MULTIPLE CHOICE QUESTION
30 sec • 1 pt
What is the final step to ensure the thumb taping is done correctly?
Check for tightness
Apply another layer of tape
Remove the tape and reapply
Squeeze the thumb to check blood flow
Access all questions and much more by creating a free account
Create resources
Host any resource
Get auto-graded reports
Continue with Google

Continue with Email
Continue with Microsoft
or continue with

%20(1).png)
Apple
Others
Already have an account?
