
 Worksheets
VEX Code VR U3&4
Total questions: 25
Worksheet time: 13mins
Name
Class
Date
1.
1. What is the first step in coding the VR Robot to move the VR Pen down to draw a black line?
a)
[Drive for] block set to 2000 millimeters (mm).
b)
Drag the [Turn for] block into the workspace and set the parameter to "400 millimeters (mm)".
c)
Drag the [move robot pen] block into the workspace and use the drop-down menu to set the position to "down".
d)
Drag the [move robot pen] block into the workspace and use the drop-down menu to set the position to "up".
2.
2. What is the first step in coding the VR Robot to draw a red line?
a)
Drag the [Set Pen color] block into the workspace and use the drop-down menu to set the color to "red".
b)
Drag the [move robot pen] block into the workspace and use the drop-down menu to set the position to "up".
c)
Drag the [Turn for] block into the workspace and set the parameter to "200 millimeters (mm)".
d)
Drag the [Set Pen color] block into the workspace and use the drop-down menu to set the color to "blue".
3.

3. How many times will the [Repeat] block repeat the [Turn for] and [Drive for] blocks inside of it?
a)
Only once.
b)
Two times.
c)
Three times.
d)
Four times.
4.
4. What types of values can the [Repeat] block accept as parameters?
a)
Decimal values.
b)
Negative values.
c)
Words or text.
d)
Integers
5.
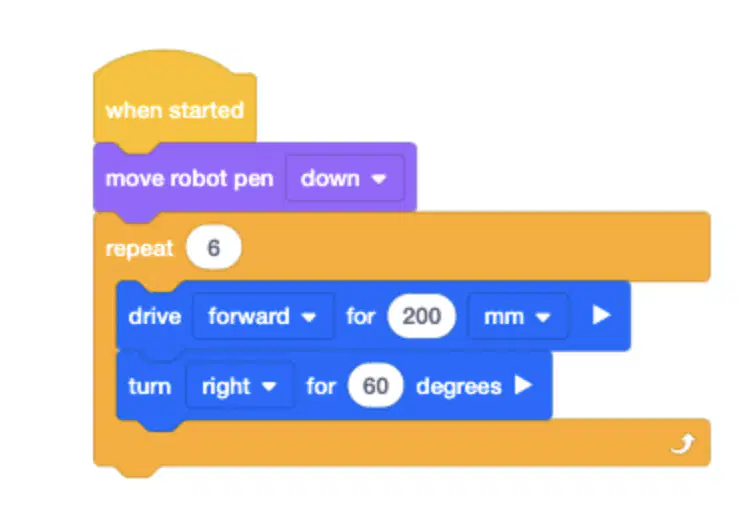
5. What is the condition that will end this [Repeat] block?
a)
After the VR Robot places the pen down.
b)
After the VR Robot drives forward one time for 200 millimeters (mm).
c)
After the [Repeat] block has repeated the blocks inside of it four times.
d)
After the VR Robot has driven forward 200 millimeters (mm) then turned right 60 degrees six times.
6.
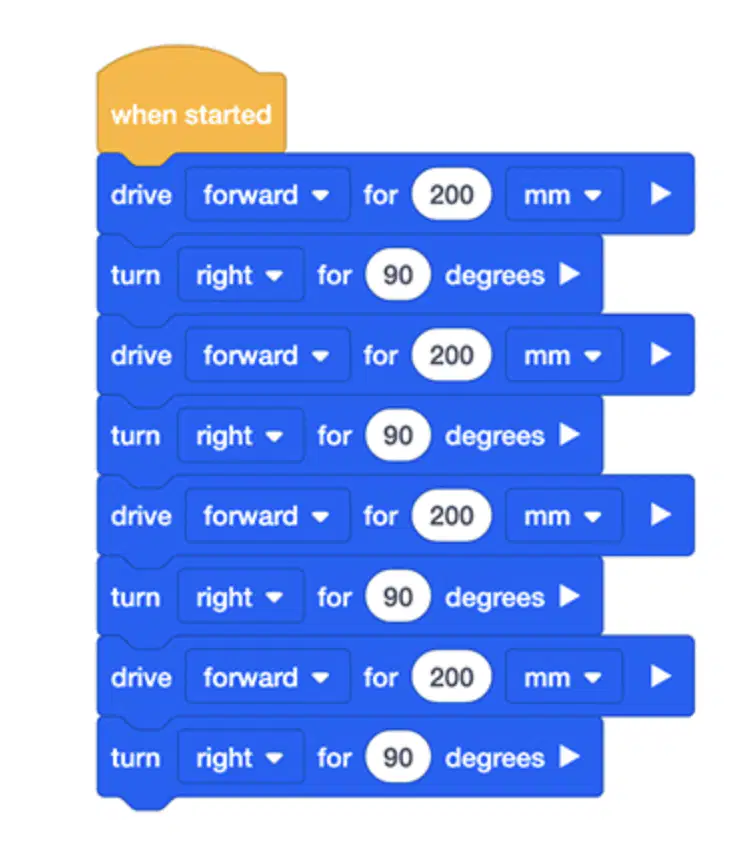
6. How can the following example be simplified by using a [Repeat] block?
a)
By placing the [Drive for] and [Turn for] blocks in a [Repeat] block that repeats four times.
b)
By placing the [Drive for] block in a [Repeat] block that repeats four times.
c)
By placing the [Turn for] block in a [Repeat] block that repeats four times.
d)
By changing all of the parameters of the [Drive for] blocks to 400 millimeters (mm) instead of 200 millimeters (mm).
7.
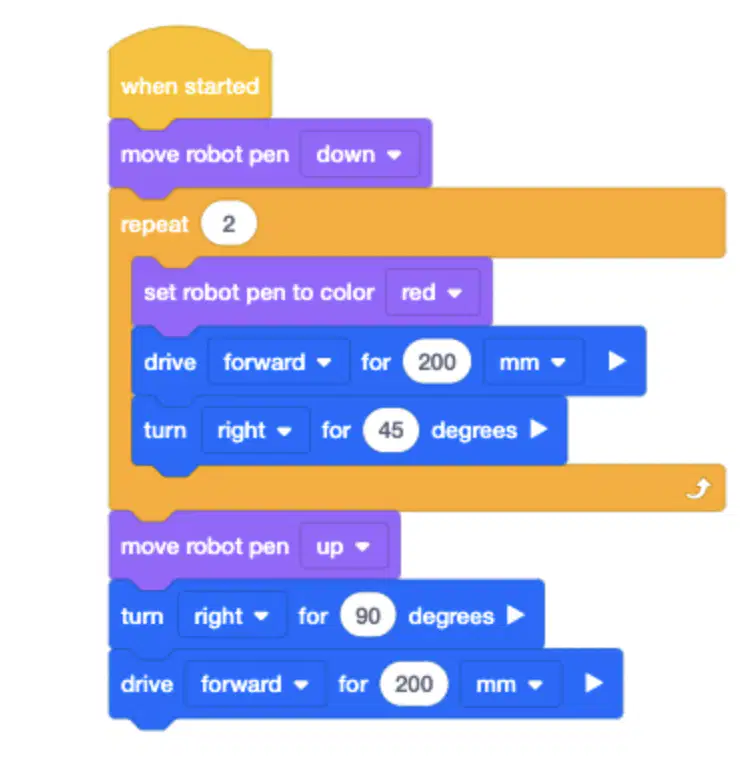
7. When will the VR Robot move the VR Pen up?
a)
Before the [Repeat] block has repeated all of the blocks inside of it twice.
b)
Before the VR Pen is set to the color red.
c)
After the [Repeat] block has repeated all of the blocks inside of it six times.
d)
After the [Repeat] block has repeated all of the blocks inside of it twice.
8.
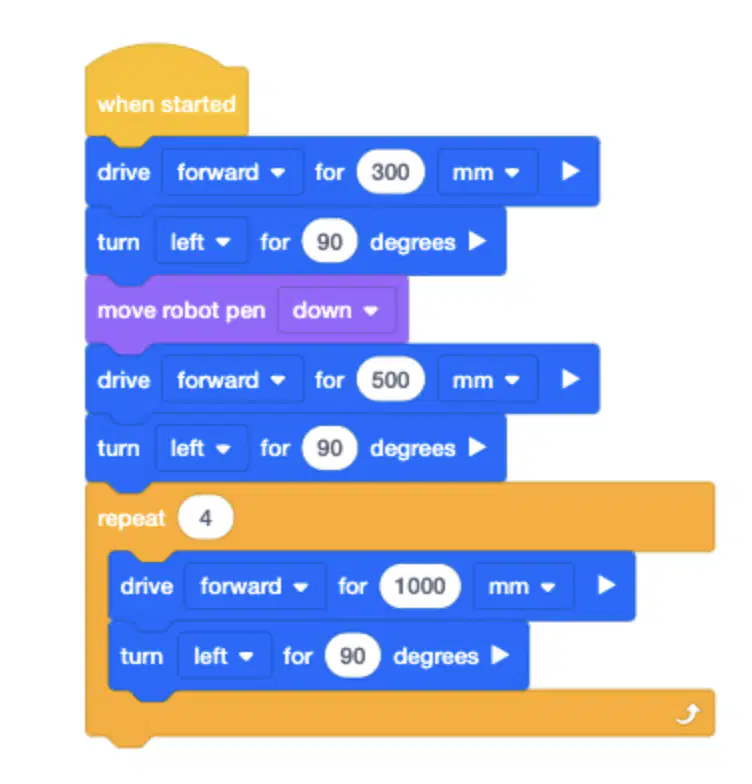
8. The following project was created to draw a house, but it is unfinished. Which of the following blocks should be used next to begin drawing the roof of the house?
a)
[move robot pen] block set to "up"
b)
Drive for block set to 2000 millimeters (mm)
c)
[Repeat] block set to six
d)
[Turn for] block set to 135 degrees
9.
9. Which block reports if the Bumper Switch is pressed?
a)
<Pressing bumper>
b)
<Distance found object>
c)
<Color near object>
10.
10. What values does the block return?
a)
TRUE (pressed) or FALSE (released).
b)
Positive (pressed); Negative (released).
c)
Number values between one and ten.
d)
Distance from object in millimeters (mm).
11.
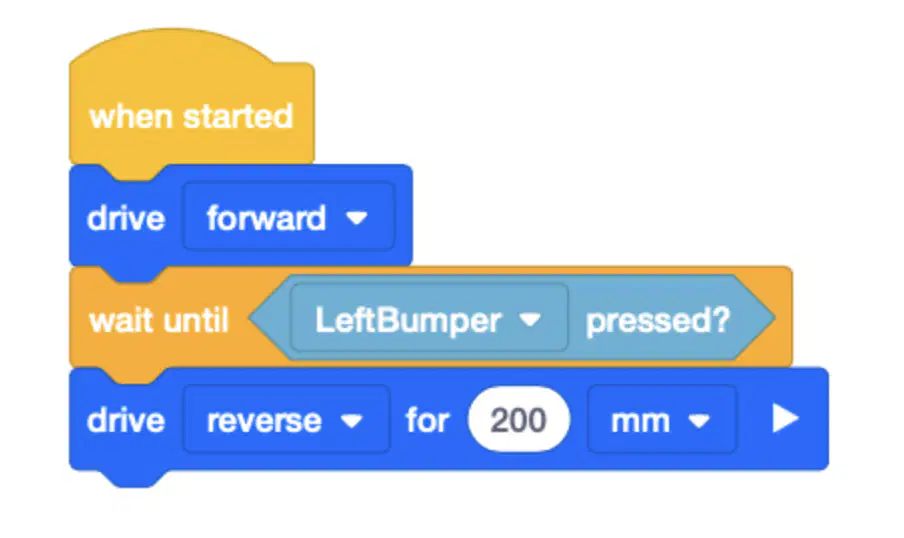
11. What will happen when the Bumper Sensor is pressed in this project?
a)
The VR Robot will turn left for 90 degrees.
b)
The VR Robot will stop moving.
c)
The VR Robot will turn right for 90 degrees.
d)
The VR Robot will drive in reverse for 200 millimeters (mm).
12.
12. What does the block report if the Bumper Sensor is pressed?
a)
Reports TRUE.
b)
Reports FALSE.
c)
Reports a measured distance.
d)
Reports an object found.
13.
13. How could you use the Bumper Sensor in the Wall Maze challenge?
a)
To calculate the distances between the VR Robot and a wall.
b)
To instruct the VR Robot to turn when it bumps into a wall.
c)
To make the VR Robot ascend a wall to finish the maze faster.
d)
To determine the color of the wall.
14.
14. What do non-waiting blocks do in a VEXcode VR project?
a)
They repeat a behavior forever.
b)
They skip the next block in the stack.
c)
They allow the stack to continue even if the block's behavior is not yet complete.
d)
They should only be used in an emergency.
15.
15. Which statement is TRUE for waiting blocks?
a)
They wait for the user to select the "Step" button.
b)
They wait until the VR Robot has enough power to complete the task.
c)
They allow the rest of the stack to continue even if that block's behavior has not been completed.
d)
They pause the stack until that block's behavior has been completed.
16.
16. What does the highlighting feature do when a waiting block is being executed?
a)
A highlight will appear around the block until the behavior is complete.
b)
It will change colors depending on whether the project is running a waiting or non-waiting block.
c)
It will move to the next block to show the next behavior in the project.
d)
A highlight will stay on the block until the entire project is complete.
17.
17. What types of values does the [Wait until] block accept?
a)
Boolean values: TRUE or FALSE.
b)
Numeric values: one - ten.
c)
Color values.
d)
Time values.
18.
18. How often will the [Wait until] block check a Boolean condition?
a)
It will check repeatedly until the Boolean reports FALSE.
b)
It will check repeatedly until the Boolean reports TRUE.
c)
It will check once every minute until the project is complete.
d)
It will check only once.
19.

19. How is the block used in this project?
a)
It pauses the project indefinitely.
b)
It causes the VR Robot to move forward for 200 millimeters (mm).
c)
It checks the condition of the Bumper Sensor. When TRUE, the VR Robot will turn right 180 degrees.
d)
It instructs the VR Robot to turn to 90 degrees.
20.
20. How is the [Wait until] block used with the block?
a)
The block is placed before the [Wait until] block.
b)
The [Wait until] block is placed before the block.
c)
The Boolean is placed in the hexagonal shape inside the [Wait until] block.
d)
Both blocks are placed side-by-side at the beginning of a project.
21.
21. How do you change a [Drive for] block from waiting to non-waiting?
a)
Select the arrow to expand "and don't wait".
b)
Place them in a Non Waiting "C" block.
c)
These blocks are always non-waiting blocks.
d)
Add a hexagonal Boolean inside the [Wait until] block.
22.

22. Which Boolean reporter block would you use with [Wait until] to create a project that instructs the VR Robot to drive forward until the bumper sensor is pressed in this project?
a)
<Distance found object>
b)
<Pressing bumper>
c)
<Drive is moving>
d)
<Color sensing>
23.
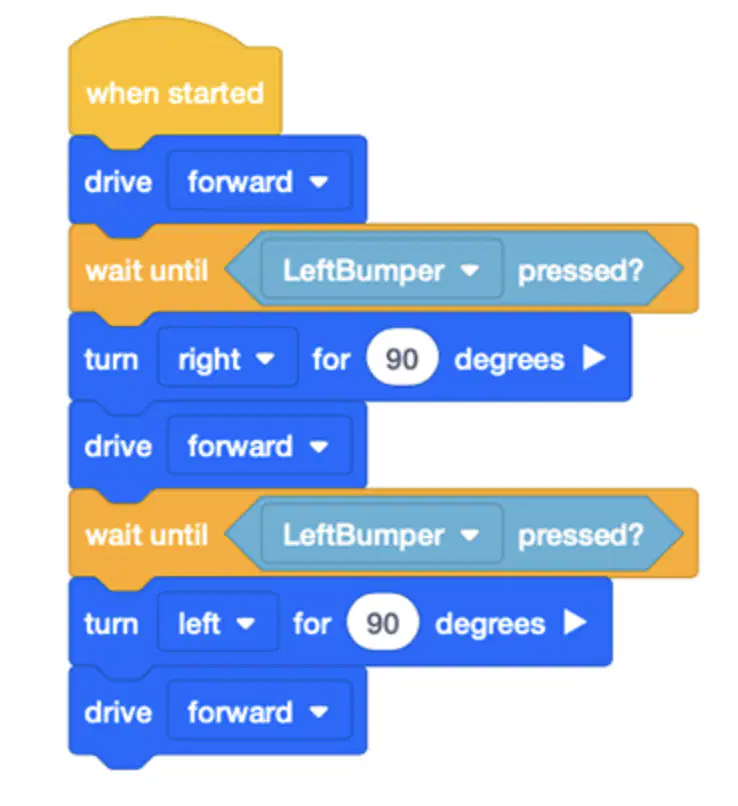
23. What is the order in which behaviors will be executed in this project?
a)
Drive Forward until Left Bumper is pressed, Turn right for 90 degrees, Drive Forward until Left Bumper is pressed, Turn Left for 90 degrees, Drive Forward.
b)
Drive Forward; Turn Right for 90 degrees; Drive Forward when Left Bumper is pressed; Turn Left for 90 degrees\: Drive Forward when Left Bumper is Pressed.
c)
Drive Forward until Right Bumper is pressed, Turn Left for 90 degrees, Drive Forward, Turn Left for 90 degrees, Drive Forward.
d)
Drive Forward,Turn Right for 90 degrees, Drive Forward until Left Bumper is pressed, Turn Left for 90 degrees, Drive Forward until Left Bumper is Pressed.
24.

24. What does the conditional evaluate in the [Wait until] block?
a)
Is the bumper pressed.
b)
Has the Distance Sensor found an object in front of the VR Robot.
c)
Is the Color sensor close to an object.
d)
The timer value.
25.
25. Which is NOT a reason to use a condition in a VEXcode VR project?
a)
To utilize sensors in a project.
b)
To control the flow of a project.
c)
To create the best way for the VR Robot to run properly in a specific playground.
d)
To instruct the VR Robot to perform different behaviors depending on the conditional values that are reported.
100 %

