
 Worksheets
Multi-Camera Editing Quiz
Total questions: 62
Worksheet time: 33mins
What is the first step in creating a multi-camera sequence?
Synchronize all clips in the timeline
Use the Create Multi-Camera Source Sequence option
Enable Multi-Camera View
Apply Lumetri Color
How do you activate multi-camera editing in the timeline?
Click the Wrench icon and select Multi-Camera
Right-click the timeline and choose Enable Multi-Camera Editing
Use the Sequence Settings panel
Press Ctrl+Shift+M
What happens when you press the numeric keys (1, 2, 3, etc.) in the Multi-Camera View?
Adjusts the clip speed
Selects different camera angles
Edits the audio channels
Toggles between clip markers
When editing in Multi-Camera View, what happens if you make a mistake while switching angles?
You need to restart the sequence
Use the Roll Edit Tool to fix the cuts
Use the Razor Tool to add new cuts
Re-select the desired camera angle in the timeline
What is the advantage of using markers before creating a multi-camera sequence?
Automatically applies transitions
Helps with synchronization
Highlights color mismatches
Saves clips in a new bin
What does the Lumetri Color panel allow you to adjust?
Transitions
Keyframes
White balance, exposure, and saturation
Clip speed
What is the purpose of an adjustment layer?
To apply effects to individual clips
To add effects across multiple clips
To create keyframes
To render the sequence
Where do you create an adjustment layer in Premiere Pro?
File > New > Adjustment Layer
Right-click the timeline > Add Adjustment Layer
Sequence > New Adjustment
Window > Effects
What happens if you place an adjustment layer above a clip?
The layer becomes invisible
The effects on the adjustment layer are applied to the clip below
The adjustment layer moves automatically
The clip is muted
What is one advantage of using adjustment layers for color grading?
Easier to reset changes
Automatically applies masks
Faster rendering
Avoids frame blending
How do you apply Lumetri Color to an adjustment layer?
Drag the Lumetri effect onto the layer
Use the Effects Control panel
Create a nested sequence
Right-click the layer
How can you adjust the white balance of a clip?
Use the White Balance Selector in Lumetri Color
Apply a Color Match
Use the Opacity slider
Add a mask
What is the main purpose of clip markers?
Syncing audio and video
Highlighting key moments in a specific clip
Adjusting transitions
Splitting the timeline
How do you add a clip marker?
Press M while selecting a clip
Use the Pen Tool
Right-click the timeline
Open the Effects Control panel
What color are clip markers by default?
Yellow
Green
Red
Blue
What happens if you delete a clip containing markers?
Markers are preserved
Markers are deleted with the clip
Markers are moved to the timeline
Markers are converted into keyframes
What is the best way to quickly switch between angles during the edit?
Enable Multi-Camera View
Use the Razor Tool
Apply Lumetri effects
Add adjustment layers
The color of the footage appears inconsistent across angles. What should you do?
Apply Lumetri Color to each clip
Apply Lumetri Color to an adjustment layer across all clips
Use the Color Match Tool
Add a mask
How can you ensure each goal scored matches the beat of the background music?
Use clip markers to sync beats with goals
Create nested sequences
Adjust frame rates
Add transitions
Your director asks for brighter highlights for the entire sequence. What should you do?
Adjust brightness in each clip
Use Lumetri Color on an adjustment layer
Apply the Brightness effect
Change the sequence settings
How can you ensure transitions align with tricks in the video?
Add clip markers on the tricks
Use random cuts
Apply the Morph Cut effect
Change frame rates
A client asks for a quick color correction for their interview video. What is the fastest way to make basic adjustments?
Create an adjustment layer and use the Lumetri Color panel
Apply individual effects to each clip
Export the clip and edit it in Photoshop
Change the sequence settings
Your client wants the footage to feel “warmer.” Which adjustment should you prioritize?
Reduce shadows
Increase the white balance temperature
Add more saturation
Adjust the sharpness
The client’s footage is shaky. How should you fix it?
Use the Warp Stabilizer effect
Apply an adjustment layer
Change the sequence settings
Reduce the frame rate
The client wants the project delivered today, but the colors look flat. What’s the best way to improve them quickly?
Increase saturation in the Lumetri Color panel
Apply heavy transitions
Export it as is
Add random filters
You’re behind schedule, and the client needs their video immediately. What should you focus on?
Basic edits and meeting essential client requests
Adding advanced effects
Overhauling the entire project
Experimenting with new techniques
The client asks for a quick version of the video in black and white. What’s the fastest method?
Apply a Lumetri Color black-and-white preset
Reduce saturation to 0 for each clip
Create a new sequence and re-edit everything
Adjust the frame rate
The client needs a shorter version of their video. What should you do first?
Identify key moments and trim unnecessary clips
Delete random parts
Add new effects
Start over from scratch
Your client says the transitions feel "too distracting." What should you do?
Replace them with simple cuts or dissolves
Add more transitions
Ignore the feedback
Use fancy effects
The client wants the text in the video to stand out more. What’s the best adjustment?
Add a bold font with high contrast
Reduce the text size
Use complex fonts
Remove the text
The client feels their product shots lack focus. How can you enhance them?
Use Lumetri Color to increase sharpness and contrast
Add a blur effect
Change the aspect ratio
Re-shoot the product
A client gives vague feedback, like “Make it pop.” What’s the best course of action?
Ask clarifying questions about their expectations
Ignore the feedback
Apply random effects
Change the music
The client requests a specific look but hasn’t provided examples. What’s the best approach?
Provide sample edits for approval
Guess and apply random effects
Focus on color correction only
Export the current version
The client says the pacing feels off. What could they mean?
The transitions are too long or short
The colors are mismatched
The audio is too loud
The font is too small
A client wants faster cuts in their promotional video. How do you respond?
Trim clips to match the desired pacing
Add slow motion effects
Remove key moments
Extend transitions
Your client notices a spelling mistake in a title after delivery. How do you handle it?
Correct it immediately and send an updated version
Ignore the issue
Blame the client for not catching it earlier
Delete the title entirely
A client asks for a specific transition between two clips. What’s your first step?
Ask for clarification about their vision
Apply random transitions
Use default effects
Skip transitions altogether
The client wants the video to fit a 1:1 aspect ratio for social media. How do you adjust the project?
Change the sequence settings to 1080x1080
Crop all clips
Export as is
Add a blur effect
The client wants an emotional tone for their video. What should you focus on?
Soft lighting and slow transitions
Bright colors and fast cuts
Heavy saturation
High contrast
You’re editing a 1080x1920 video, but the footage is 1920x1080. What’s the first step?
Scale and reposition the footage to fit the vertical frame
Rotate the footage
Export without changes
Use a square aspect ratio
A client needs a square version of a 1920x1080 video. What resolution should you use?
1080x1080
720x720
1920x1920
1440x1080
What is the ideal resolution for exporting horizontal YouTube videos?
1920x1080
1080x1920
1280x720
640x480
What happens if you drag a 1080x1920 clip into a 1920x1080 sequence without adjustments?
The clip will appear cropped
The clip will stretch to fit
The sequence will automatically resize
The clip will export in its original resolution
How can you create a 1080x1920 vertical sequence in Premiere Pro?
Create a new sequence and manually change the dimensions in Settings to 1080x1920
Use the default settings
Rotate the original sequence
Export the project first
When creating a new sequence for a 1920x1080 video, what preset should you use?
DV NTSC
DSLR 1080p at 24, 30, or 60 fps
4K UHD
Mobile Device
What is the aspect ratio of a 1080x1920 resolution?
16:9
9:16
1:1
4:3
What is the aspect ratio of a 1920x1080 resolution?
1:1
16:9
4:3
9:16
What happens when you manually add tracks using the “Add Tracks” dialog?
It allows you to add video-only or audio-only tracks and customize their placement
It automatically fills the tracks with blank content
It merges existing tracks
It deletes empty tracks
If you need to add both a video and audio track simultaneously, what should you do?
Right-click on the track header and select “Add Tracks”
Drag a clip that contains both video and audio onto the timeline
Adjust sequence settings
Use the Pen tool
Why would you rename a track in Premiere Pro?
To delete unnecessary clips
To organize and identify the content on that track more easily
To apply effects
To automatically sort clips
What should you do if you accidentally rename the wrong track?
Restart Premiere Pro
Undo the action (Ctrl+Z or Cmd+Z
Export and re-import the timeline
Delete the track and start over
You want to delete multiple empty tracks at once. What is the quickest way?
Right-click a track header and choose “Delete Tracks,” then check “Delete All Empty Tracks”
Manually delete each track
Use the Delete key on your keyboard
Drag all the clips to another timeline
A client asks you to keep all audio tracks organized. You decide to rename the second audio track “Voiceover.” How do you do this?
Right-click the track header and type “Voiceover”
Use the Rename tool from the Effects panel
Right-click the timeline and choose “Rename”
Double-click the track header and type “Voiceover”
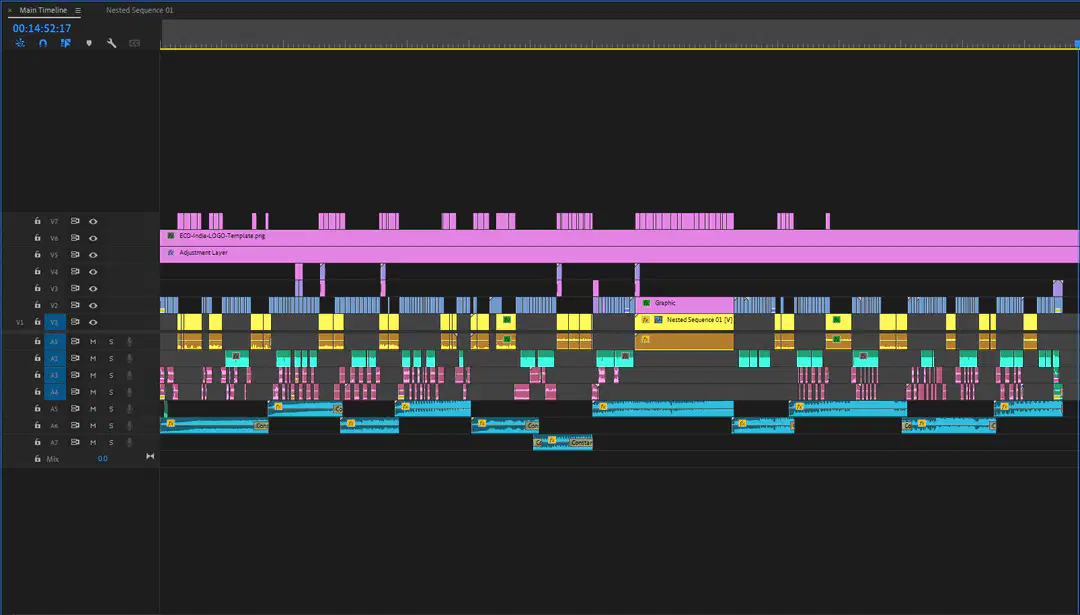
If color grading has been done, what track would you (most likely) have to delete to remove it?
V3
V5
A5
A3
V7
A clip marker is a tool used to mark specific points on a (a) for reference or editing.
The shortcut to add a clip marker is the _ key.
(a)
You can change the (a) of a clip marker to differentiate its purpose or type.
What is the primary purpose of color correction?
To create artistic visual styles
To match colors across clips for consistency
To adjust the audio levels of a video
To add cinematic LUTs to the footage
Which of the following is an example of color correction?
Adjusting the highlights, shadows, and midtones for proper exposure
Adding a teal and orange look to a video
Creating a desaturated, noir-style appearance
Applying a LUT to achieve a filmic look
Which is a key distinction between color correction and color grading?
Color correction is for creative purposes, while grading is for technical adjustments.
Color grading focuses on adjusting exposure and white balance.
Color correction ensures consistency, while grading enhances mood and style.
Color grading is only done on RAW footage.
You must always perform color correction before color grading.
True
False
Color correction and color grading are the same thing.
True
False

