
Font size
 Worksheets
N5 D&M Section 1 Question 1 practice
Total questions: 20
Worksheet time: 30mins

Name two suitable smooth manufactured boards for the back panel.
MDF
Pine
Plywood
Oak
What are two benefits to using manufactured board for the back panel of the bathroom cabinet shown?
Cheaper than solid wood and it shows the grain
It shows the grain and it's available in large, wide boards
Cheaper than solid wood and it's available in large, wide boards
Cheaper than solid wood and it's available in strips
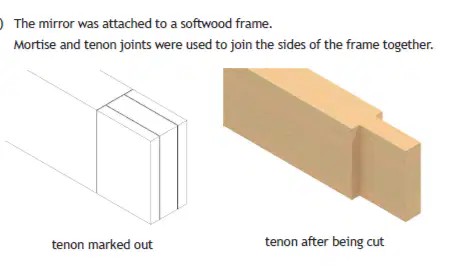
Describe how to mark out the tenon, with reference to workshop tools.
Measure and mark position of joint on top surface with a steel rule and pencil, draw lines at 90 degrees with an engineer's square then mark depth of lines with mortise gauge.
Measure and mark position of joint on top surface with rule and pencil, draw lines at 90 degrees with a ruler then mark depth of lines with mortise gauge.
Measure and mark position of joint on top surface with a steel rule and pencil, draw lines at 90 degrees with a try square then mark depth of lines with mortise gauge.
Measure and mark position of joint on top surface with rule and pencil, draw lines at 90 degrees with try square then saw the tenon off
Outline two safety checks that should be carried out on the pillar drill
prior to drilling.
The chuck key is removed from the chuck and you have safety goggles on
The chuck key is removed from the chuck and the guard is down
You have safety goggles on and the guard is down
You have safety goggles and an apron on
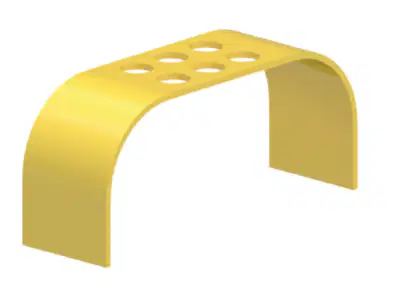
Describe the stages used to form the curves in the acrylic toothbrush
holder, with reference to workshop tools/equipment.
Heat plastic with a blow torch, bend around a former then secure it in place until it cools and sets
Heat plastic in the oven, bend around a former then secure it in place until it cools and sets
Heat plastic in the oven, bend with the vice then secure it in place until it cools and sets
Heat plastic in the oven, bend around a former then secure it in place until i heats up again
Outline two ways of ensuring a high-quality finish on a part when
using the wood lathe
Ensure that the lathe tools are sharp and feed the lathe tool quickly
Slow the speed of the lathe and sand the work using a range of glass paper grades from rough to smooth
Ensure that the lathe tools are sharp and slow the speed of the lathe
Ensure that the lathe tools are sharp and sand the work using a range of glass paper grades from rough to smooth
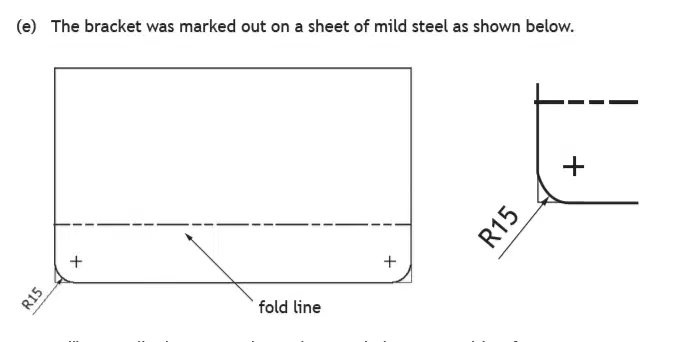
Describe how to mark out the rounded corners, with reference to
workshop tools.
Set callipers to correct size using rule and mark lines with them, centre punch the middle of the crosses then draw lines at 90° using a scriber and Engineer’s square
Set odd-leg callipers to correct size using rule and mark lines with them, use a bradawl to mark the middle of the crosses then draw lines at 90° using a scriber and Engineer’s square
Set odd-leg callipers to correct size using rule and mark lines with them, centre punch the middle of the crosses then draw lines at 90° using a scriber and Engineer’s square
Set odd-leg callipers to correct size using rule and mark lines with them, centre punch the middle of the crosses then draw lines at 90° using a scriber and try square
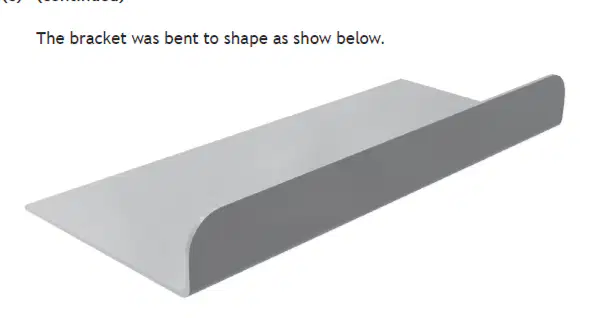
Describe how to form the bend on the mild steel bracket, with reference
to workshop tools.
Place the metal in bending bars/vice at the edge to be bent, use a mallet to bend the metal bar, use a former or jig to check the angle of the bend.
Place the metal in a machine vice at the edge to be bent, use a mallet to bend the metal bar, use a former or jig to check the angle of the bend.
Place the metal in bending bars/vice at the edge to be bent, use a hammer to bend the metal bar, use a former or jig to check the angle of the bend.
Place the metal in bending bars/vice at the edge to be bent, use a mallet to bend the metal bar, use a try square to check the angle of the bend.

Describe two ways of ensuring a good quality thread is cut, with reference to
workshop tools and equipment.
Use oil and cut by completing half a turn forward then a quarter turn back.
Use cutting compound and cut by completing a full turn forward then a quarter turn back.
Use cutting compound and cut by completing half a turn forward then a quarter turn back.
Use cutting compound and cut by completing half a turn forward then a half back.
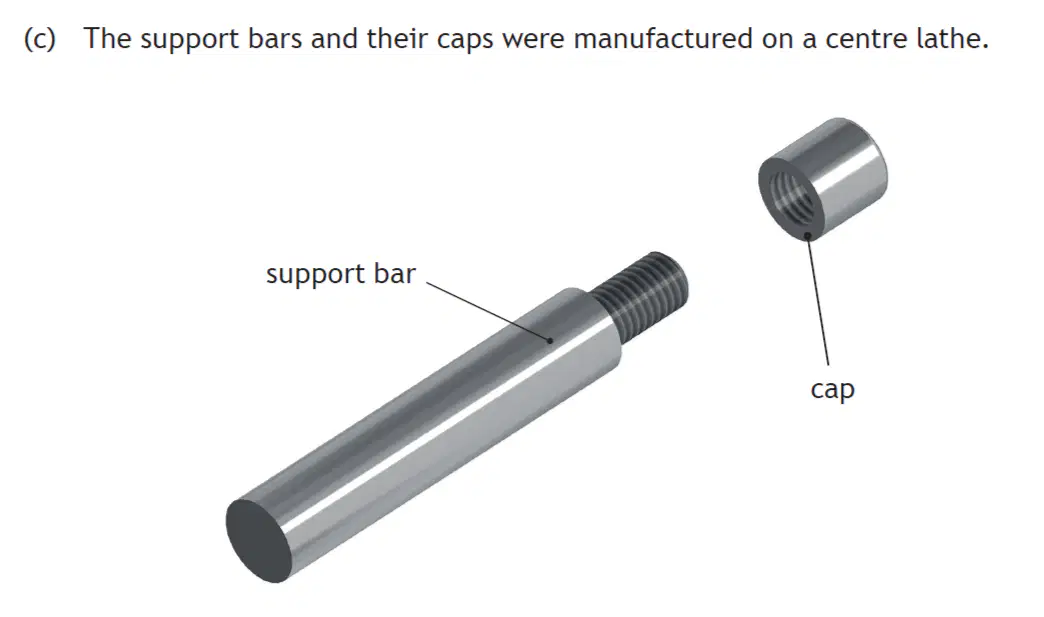
Outline two safety checks that must be carried out on the centre
lathe before the parts are manufactured.
Make sure the guard is down and the material is secure in the chuck.
Make sure the guard is down and you are wearing safety goggles.
Make sure you are wearing safety goggles and the material is secure in the chuck.
Make sure the tool rest is at the right height and the material is secure in the chuck.
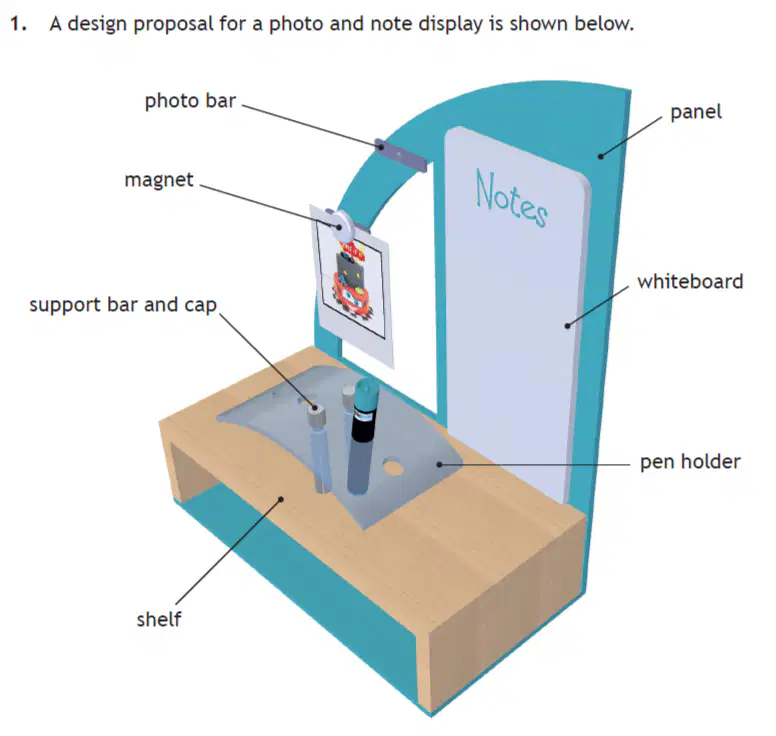
The photo bars were dip coated.
Describe how the photo bars would be dip coated, with reference to
workshop tools and equipment.
Heat metal in the forge or oven, suspend the material in paint until evenly coated, leave to cool then reheat to improve the finish
Heat metal with a strip heater, suspend the material in powder until evenly coated, leave to cool then reheat to improve the finish
Heat metal in the forge or oven, suspend the material in powder until evenly coated, leave to cool then reheat to improve the finish
Heat metal in the forge or oven, suspend the material in powder until evenly coated, leave to cool in the fridge
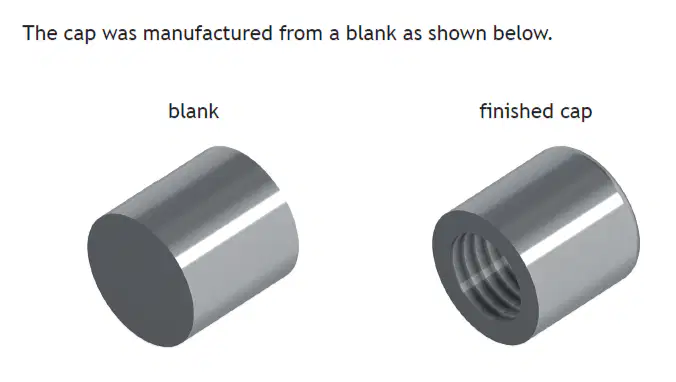
Describe how the hole for threading would be created from the
blank, with reference to workshop tools and equipment.
Indent end of bar with centre drill, use steel rule to indicate correct depth for drilling and create hole with twist drill.
Indent end of bar with centre drill, use scale on headstock to indicate correct depth for drilling and create hole with twist drill.
Indent end of bar with a bradawl, use scale on tailstock to indicate correct depth for drilling and create hole with twist drill.
Indent end of bar with centre drill, use scale on tailstock to indicate correct depth for drilling and create hole with twist drill.
Describe how the thread would be created from the
blank, after the hole has ben drilled. You should reference workshop tools and equipment.
Use cutting compound on the tap, make sure the tap is accurately aligned, then cut using a half turn forward, quarter turn back.
Use oil on the tap, make sure the tap is accurately aligned, then cut using a half turn forward, quarter turn back.
Use cutting compound on the tap, make sure the tap is accurately aligned, then cut using a full turn forward, quarter turn back.
Use cutting compound on the die, make sure the die is accurately aligned, then cut using a half turn forward, quarter turn back.
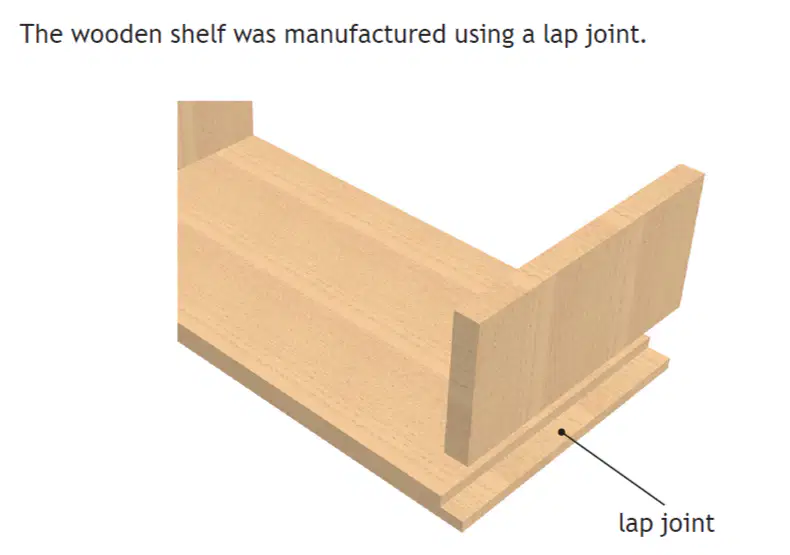
Describe how the lap joint could be marked out accurately.
You must refer to workshop tools in your answer.
Measure the thickness of the wood and mark from end of the other piece with a steel rule, draw lines at 90 degrees with engineers square then mark depth with marking gauge.
Measure the thickness of the wood and mark from end of the other piece with a steel rule, draw lines at 90 degrees with try square then mark depth with marking gauge.
Measure the length of the wood and mark from end of the other piece with a steel rule, draw lines at 90 degrees with try square then mark depth with marking gauge.
Measure the thickness of wood and mark from end of the other piece with a gauge, draw lines at 90 degrees with try square then mark depth with marking gauge.
Describe how the lap joint could be cut out accurately after marking out. You must refer to workshop tools in your answer.
Cut the line to the required depth with a coping saw then remove the waste wood with
a chisel and level the bottom of the joint with a chisel.
Cut the line to the required depth with a tenon saw then remove the waste wood with
a file and level the bottom of the joint with a file.
Cut the line to the required depth with a tenon saw then remove the waste wood with
a chisel and level the bottom of the joint with a chisel.
Cut the line to the required depth with a drill then remove the waste wood with
a chisel and level the bottom of the joint with a chisel.
Outline two reasons why varnish is a suitable finish for a pine shelf.
It's transparent so allows the wood grain to be seen and can be applied with a sponge
It's transparent so allows the wood grain to be seen and protects it from heat.
It's transparent so allows the wood grain to be seen and makes it easier to clean.
It adds a bright colour to the pine and makes it easier to clean.
Describe four stages in preparing a hardwood blank before fitting it on
the woodturning lathe, with reference to workshop tools.
Draw diagonals on ends with a rule and pencil, use a bradawl to mark centres, mark circles on ends with a marking gauge then plane along sides to the marked circle
Draw diagonals on ends with a marking gauge, use a bradawl to mark centres, mark circles on ends with a compass then plane along sides to the marked circle
Draw diagonals on ends with a rule and pencil, mark circles on ends with a compass, use a tenon saw to mark centres then plane along sides to the marked circle.
Draw diagonals on ends with a rule and pencil, use a bradawl to mark centres, mark circles on ends with a compass then plane along sides to the marked circle
Why would dip coating be an appropriate finish for a mild steel product?
Prevents corrosion and damage from heat
Prevents corrosion and dip coating can be done in lots of colours
Prevents damage from heat and dip coating can be done in lots of colours
Prevents corrosion and keeps the natural finish of the metal
Name a suitable adhesive to join pieces of softwood together
PVA glue
Glue
Epoxy Resin
Hot glue
Describe how the edges of acrylic would be finished after
sawing.
Cross file, draw file, polish, use wet and dry paper dry then use wet and dry paper wet
Cross file, draw file, use wet and dry paper wet then use wet and dry paper dry, polish
Draw file, cross file, use wet and dry paper dry then use wet and dry paper wet, polish
Cross file, draw file, use wet and dry paper dry then use wet and dry paper wet, polish

