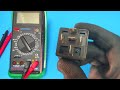
Relay Testing and Identification
Interactive Video
•
Science, Computers, Life Skills
•
7th - 10th Grade
•
Practice Problem
•
Hard

Jackson Turner
FREE Resource
Read more
5 questions
Show all answers
1.
MULTIPLE CHOICE QUESTION
30 sec • 1 pt
What is the first step in testing a relay?
Find the relay and take it outside
Identify the normally closed pins
Check if the relay is diode protected
Identify the voltage of the relay
2.
MULTIPLE CHOICE QUESTION
30 sec • 1 pt
How can you determine if a relay is diode protected?
By looking for a diode symbol on the relay
By identifying the voltage
By checking the resistance
By testing the normally open pins
3.
MULTIPLE CHOICE QUESTION
30 sec • 1 pt
Which pins are typically labeled '85' and '86' in a 4-pin relay?
Common pins
Normally open pins
Diode protected pins
Normally closed pins
4.
MULTIPLE CHOICE QUESTION
30 sec • 1 pt
What additional pin is found in a 5-pin relay?
Pin 86
Pin 87a
Pin 85
Pin 87
5.
MULTIPLE CHOICE QUESTION
30 sec • 1 pt
What resistance range indicates a good relay coil when tested with a multimeter?
50Ω to 200Ω
10Ω to 50Ω
200Ω to 500Ω
500Ω to 1000Ω
Access all questions and much more by creating a free account
Create resources
Host any resource
Get auto-graded reports
Continue with Google

Continue with Email
Continue with Classlink
Continue with Clever
or continue with
Microsoft
%20(1).png)
Apple
Others
Already have an account?
Similar Resources on Wayground

6 questions
Understanding Safe Practices and Emergency Measures
Interactive video
•
9th - 10th Grade
6 questions
NASA Field Expedition Quiz
Interactive video
•
9th - 10th Grade
6 questions
Budgeting with the Bean Game
Interactive video
•
6th - 8th Grade
6 questions
Hungarian Monarchy and Succession
Interactive video
•
9th - 10th Grade
6 questions
Understanding Female Reproductive Health
Interactive video
•
9th - 10th Grade
6 questions
Effective Study Strategies Quiz
Interactive video
•
9th - 10th Grade
6 questions
Stream Flow Measurement Quiz
Interactive video
•
9th - 10th Grade
6 questions
Fredericksburg Battlefield Quiz
Interactive video
•
9th - 10th Grade
Popular Resources on Wayground
15 questions
Fractions on a Number Line
Quiz
•
3rd Grade
20 questions
Equivalent Fractions
Quiz
•
3rd Grade
25 questions
Multiplication Facts
Quiz
•
5th Grade
54 questions
Analyzing Line Graphs & Tables
Quiz
•
4th Grade
22 questions
fractions
Quiz
•
3rd Grade
20 questions
Main Idea and Details
Quiz
•
5th Grade
20 questions
Context Clues
Quiz
•
6th Grade
15 questions
Equivalent Fractions
Quiz
•
4th Grade
Discover more resources for Science
20 questions
Cell Organelles and Functions
Quiz
•
6th - 8th Grade
33 questions
Grade 6 Quarter 3 PMA 5 Review
Quiz
•
6th - 8th Grade
12 questions
Ecological Succession
Quiz
•
7th Grade
10 questions
Exploring the Rock Cycle: Types and Formation
Interactive video
•
6th - 8th Grade
10 questions
Exploring the Layers of the Earth
Interactive video
•
6th - 10th Grade
14 questions
Biodiversity and Sustainability Quiz
Quiz
•
8th Grade
20 questions
Heredity Punnett square review
Quiz
•
8th Grade
25 questions
Naming Ionic and Covalent Compounds
Quiz
•
9th Grade