
 Worksheets
Microscope Pre-test
Total questions: 36
Worksheet time: 18mins
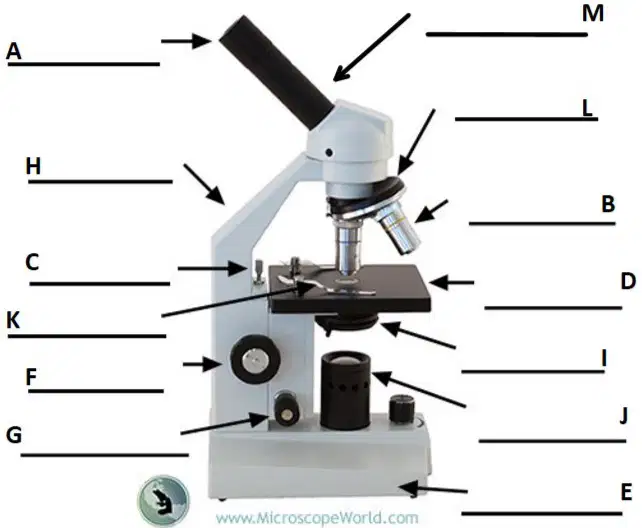
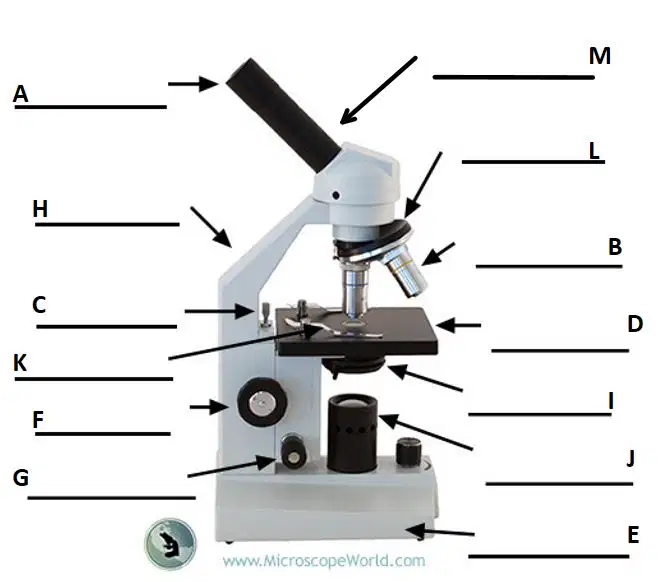
A
Body Tube
Ocular
Revolving Nosepiece
Base
Disc Diaphragm
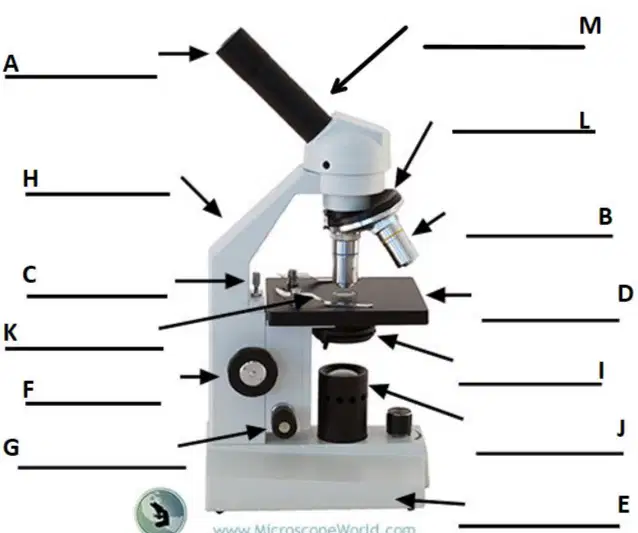
B
Stage Clips
Base
Revolving Nosepiece
Objective Lenses
Disc Diaphragm
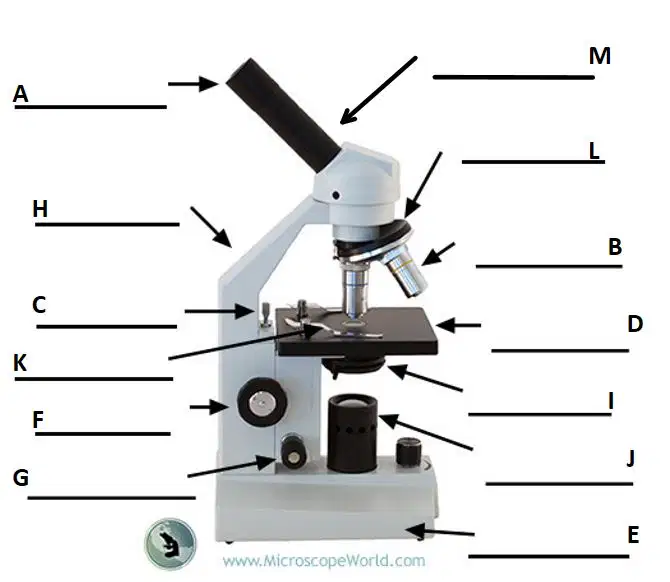
C
Stage Clips
Rack stop
Ocular
Base
Stage
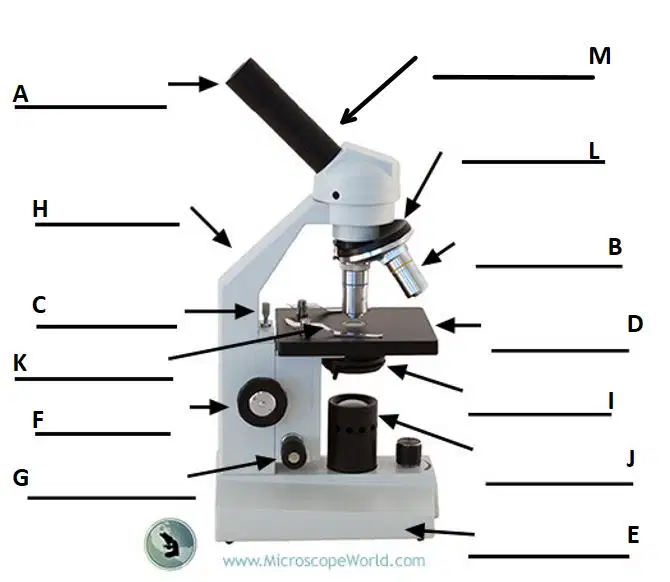
D
Stage Clips
Revolving Nosepiece
Ocular
Arm
Stage
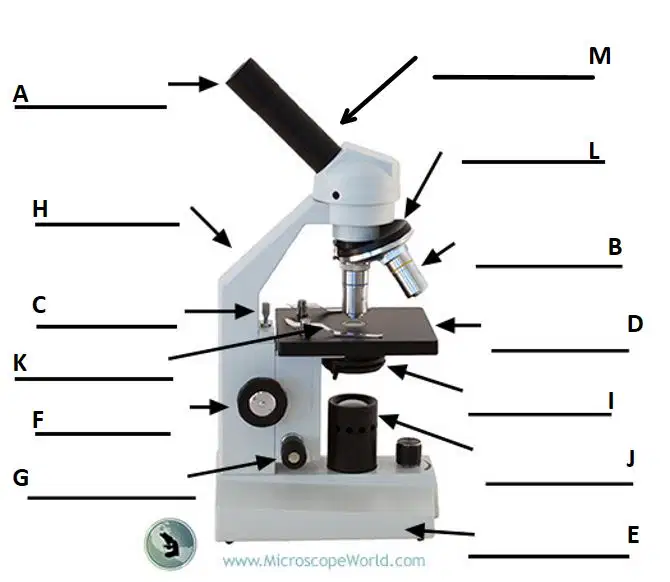
E
Base
Revolving Nosepiece
Light
Arm
Fine Adjustment Knob
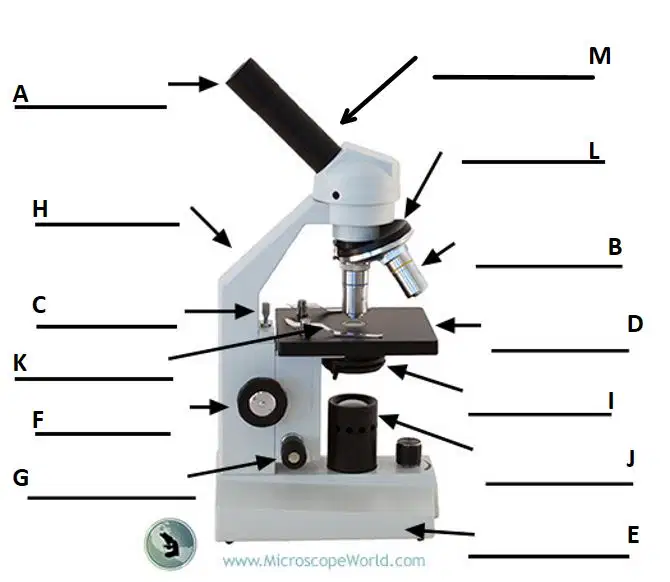
F
Low-power Objective
Revolving Nosepiece
Light
Coarse Adjustment Knob
Fine Adjustment Knob
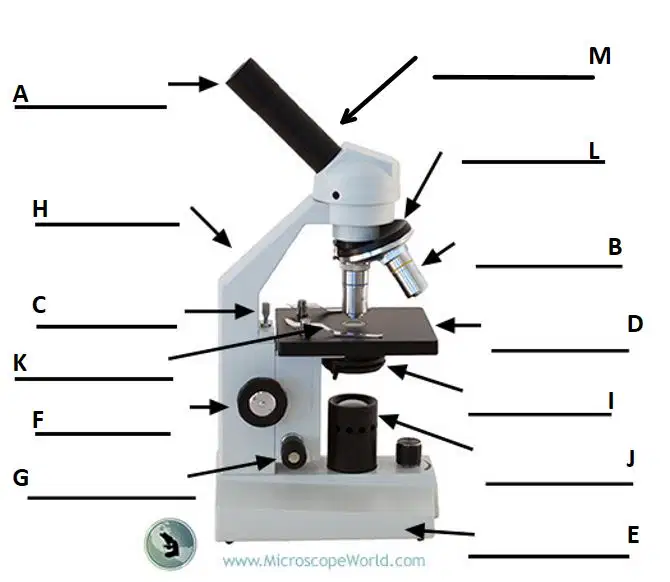
G
Low-power Objective
Revolving Nosepiece
Light
Coarse Adjustment Knob
Fine Adjustment Knob
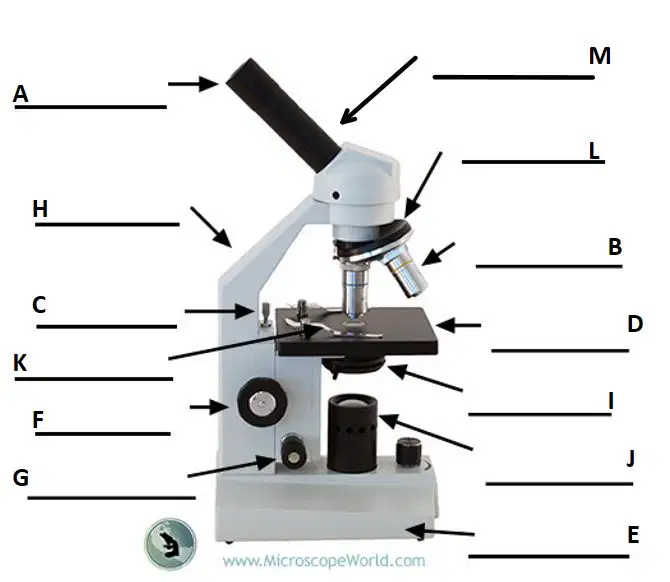
H
Body Tube
Revolving Nosepiece
Arm
Coarse Adjustment Knob
Stage
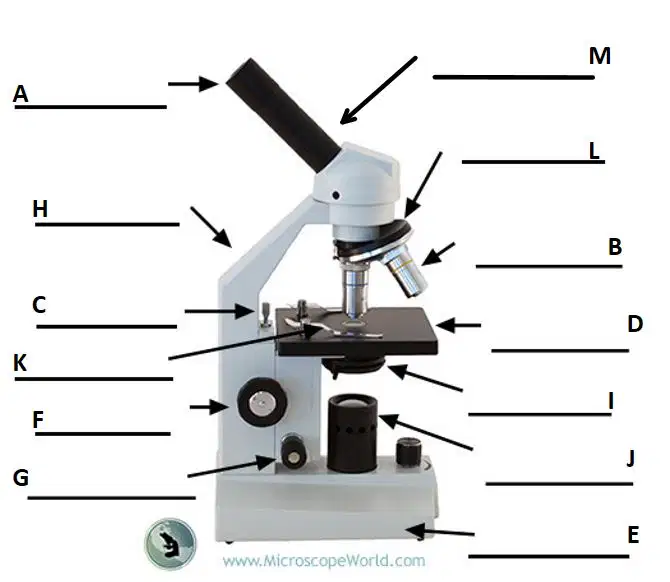
I
Revolving Nosepiece
Disc Diaphragm
Arm
Coarse Adjustment Knob
Stage
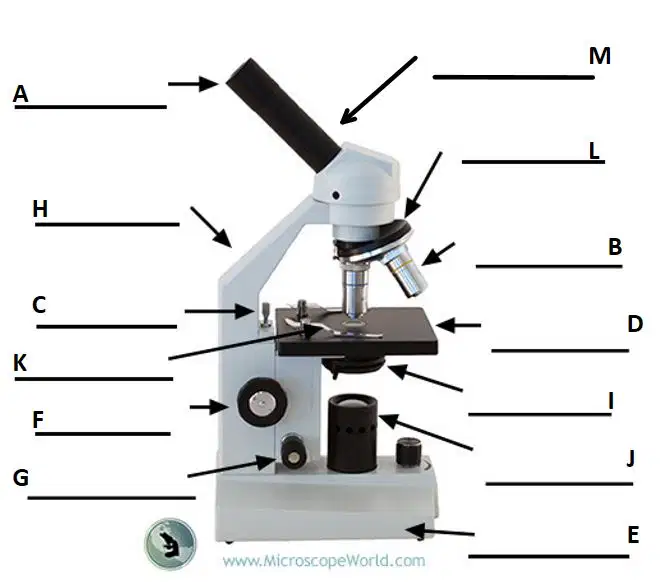
J
Revolving Nosepiece
Stage
Light
Coarse Adjustment Knob
Base
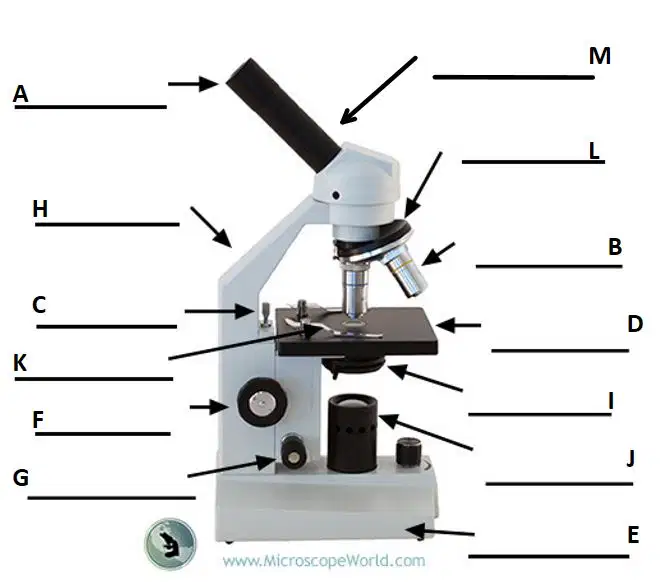
K
Revolving Nosepiece
Stage
High-power Objective
Coarse Adjustment Knob
Stage Clips
L
Revolving Nosepiece
Stage
High-power Objective
Coarse Adjustment Knob
Stage Clips
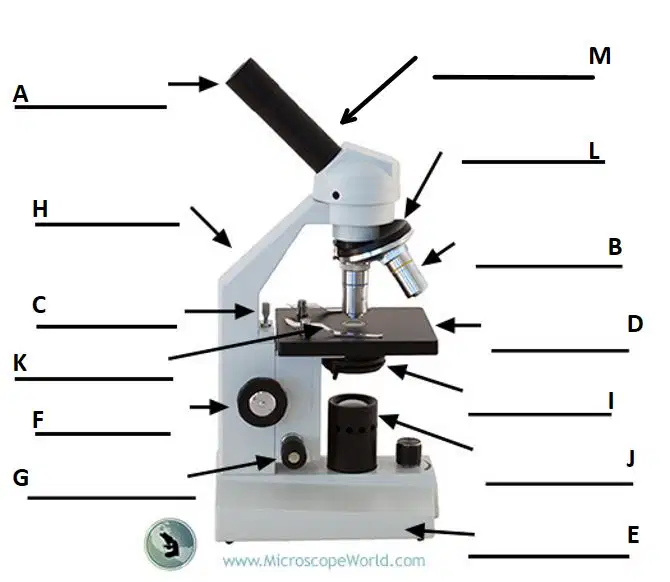
M
Revolving Nosepiece
Arm
Ocular
Body Tube
High-power Objective
Maintains correct distance between the eyepiece and the objective lens
Body tube
Disc diaphragm
High-power objective
Coarse adjustment knob
Base
Supports the microscope, hold if carrying
Body tube
Disc diaphragm
High-power objective
Coarse adjustment knob
Base
Provides the most magnification; 40x
Body tube
Disc diaphragm
High-power objective
Coarse adjustment knob
Base
Moves the stage up and down for focusing RAPIDLY; big movement
Body tube
Disc diaphragm
High-power objective
Coarse adjustment knob
Base
Regulates the amount of light directed through object and objectives
Body tube
Disc diaphragm
High-power objective
Coarse adjustment knob
Base
Holds the objective lenses, can be rotated to move to low, mid, or high magnification
Ocular
Revolving nosepiece
Stage
Low-power objective
Fine adjustment knob
Used to SHARPEN image, moves stage SLIGHTLY
Ocular
Revolving nosepiece
Stage
Low-power objective
Fine adjustment knob
Supports the slide, allows light to pass through
Ocular
Revolving nosepiece
Stage
Low-power objective
Fine adjustment knob
Contains the magnifying lens that you look through; 10x
Ocular
Revolving nosepiece
Stage
Low-power objective
Fine adjustment knob
Source of illumination directed upward through the disc diaphragm, specimen, and body tube
Stage clips
Light
Arm
Body tube
Disc Diaphragm
Supports the body tube and used in carrying the microscope
Stage clips
Light
Arm
Body tube
Disc Diaphragm
Gives the least magnification; 4x
Ocular
Revolving nosepiece
Stage
Scanning objective lens
Fine adjustment knob
Holds the microscope slide in place
Stage clips
Light
Arm
Body tube
Disc Diaphragm
Limits how far the stage can move up
Base
Rack stop
Coarse adjustment knob
Disc diaphragm
High powered objective lens
The first step in Focusing Procedures is
Make sure the SCANNING objective is set and the stage is all the way down.
Clean all the lenses with lens paper.
Plug in and turn on the microscope.
Face the arm of the microscope toward you.
Set the DISC DIAPHRAGM to the largest opening.
The second step in Focusing Procedures is
Make sure the SCANNING objective is set and the stage is all the way down.
Clean all the lenses with lens paper.
Plug in and turn on the microscope.
Face the arm of the microscope toward you.
Set the DISC DIAPHRAGM to the largest opening.
The third step in Focusing Procedures is
Make sure the SCANNING objective is set and the stage is all the way down.
Clean all the lenses with lens paper.
Plug in and turn on the microscope.
Face the arm of the microscope toward you.
Set the DISC DIAPHRAGM to the largest opening.
The fourth step in Focusing Procedures is
Make sure the SCANNING objective is set and the stage is all the way down.
Clean all the lenses with lens paper.
Plug in and turn on the microscope.
Face the arm of the microscope toward you.
Set the DISC DIAPHRAGM to the largest opening.
The fifth step in Focusing Procedures is
Make sure the SCANNING objective is set and the stage is all the way down.
Clean all the lenses with lens paper.
Plug in and turn on the microscope.
Face the arm of the microscope toward you.
Set the DISC DIAPHRAGM to the largest opening.
The sixth step in Focusing Procedures is
Clean all the lenses with lens paper.
Use the Fine Adjustment Know to sharpen the focus of the specimen.
With the slide under the stage clips, center the specimen in the Field of View.
Slowly turn the coarse adjustment knob until the image appears clearly in the Field of View.
Adjust the disc diaphragm for the correct amount of light.
The seventh step in Focusing Procedures is
Clean all the lenses with lens paper.
Use the Fine Adjustment Know to sharpen the focus of the specimen.
With the slide under the stage clips, center the specimen in the Field of View.
Slowly turn the coarse adjustment knob until the image appears clearly in the Field of View.
Adjust the disc diaphragm for the correct amount of light.
The eighth step in Focusing Procedures is
Clean all the lenses with lens paper.
Use the Fine Adjustment Know to sharpen the focus of the specimen.
With the slide under the stage clips, center the specimen in the Field of View.
Slowly turn the coarse adjustment knob until the image appears clearly in the Field of View.
Adjust the disc diaphragm for the correct amount of light.
The nineth step in Focusing Procedures is
Clean all the lenses with lens paper.
Use the Fine Adjustment Know to sharpen the focus of the specimen.
With the slide under the stage clips, center the specimen in the Field of View.
Slowly turn the coarse adjustment knob until the image appears clearly in the Field of View.
Adjust the disc diaphragm for the correct amount of light.

