

Untitled Lesson

Presentation
•
Professional Development
•
9th Grade
•
Practice Problem
•
Hard

Daniel Cote
FREE Resource
65 Slides • 0 Questions
1

2

Basic
Preparations—Mis
e en Place
16
3

Copyright Goodheart-Willcox Co., Inc. May not be posted to a publicly accessible website.
• Summarize mise en place and its role in the
professional kitchen.
Objective
4


Copyright Goodheart-Willcox Co., Inc. May not be posted to a publicly accessible website.
continued
• Mise en place (meez ahn
PLAHS) refers to
– having all foods and
equipment ready for a
specific preparation
before beginning
– a state of mental
readiness
Mise en Place
5

Copyright Goodheart-Willcox Co., Inc. May not be posted to a publicly accessible website.
continued
• Mise en place includes
– reading and understanding a recipe
– assembling all ingredients for a recipe
– verifying that all necessary pieces of equipment are
available
– setting up your station prior to service
Mise en Place
6

Copyright Goodheart-Willcox Co., Inc. May not be posted to a publicly accessible website.
• Mise en place ensures that kitchen work is orderly
and carried out efficiently
• Coordinating the efforts of many different cooks is
also necessary
• The entire staff should know the end goal and plan
to get there
• This will prevent errors in food preparation that may
be too late to remedy
Mise en Place
7

Copyright Goodheart-Willcox Co., Inc. May not be posted to a publicly accessible website.
• Execute the techniques for peeling, julienning,
and dicing an onion.
Objective
8

Copyright Goodheart-Willcox Co., Inc. May not be posted to a publicly accessible website.
• Onions are one of the most commonly used
vegetables in a professional kitchen
• An onion must be peeled before it can be sliced or
diced
• Remove the skin, stem, and root
• All cooks must become skilled at peeling, slicing,
and dicing onions
Peeling, Slicing, and Dicing an Onion
9

Copyright Goodheart-Willcox Co., Inc. May not be posted to a publicly accessible website.
continued
1.
Cut the ends off the onion. Be careful to
remove only a small amount of each end.
Notice that the onion has two distinct
ends—the stem and root end.
2.
Cut the onion in half by cutting lengthwise
through the stem and root end of the onion. If
onion rings are desired, then skip this step.
TECHNIQUE:
Peeling an Onion
10


Copyright Goodheart-Willcox Co., Inc. May not be posted to a publicly accessible website.
3.
Remove the peel from the onion using a
paring knife.
TECHNIQUE:
Peeling an Onion
11


Copyright Goodheart-Willcox Co., Inc. May not be posted to a publicly accessible website.
continued
1.
Place peeled onion halves cut side down on
the cutting board.
2.
Remove the remaining root of the onion by
making a small triangular cut with the tip of
the chef knife or paring knife.
TECHNIQUE:
Preparing Julienne Onions
12


Copyright Goodheart-Willcox Co., Inc. May not be posted to a publicly accessible website.
continued
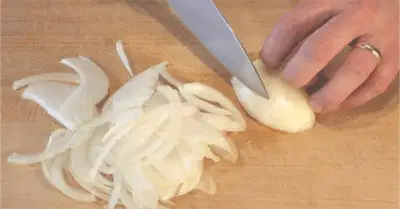
3.
Slice the onion into ⅛-inch wide slices using
the proper knife technique.
TECHNIQUE:
Preparing Julienne Onions
13

Copyright Goodheart-Willcox Co., Inc. May not be posted to a publicly accessible website.
4.
When the onion becomes too small to hold,
lay it face down on the cutting board and
continue slicing.
TECHNIQUE:
Preparing Julienne Onions
14

Copyright Goodheart-Willcox Co., Inc. May not be posted to a publicly accessible website.
continued
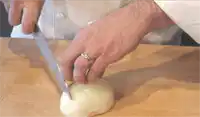
1.
Place the peeled onion half, cut side down,
on the cutting board.
2.
Place your guiding hand on top of the onion
half. Be sure that the root end of the onion
faces away from the knife.
TECHNIQUE:
Dicing Onions
15

Copyright Goodheart-Willcox Co., Inc. May not be posted to a publicly accessible website.
continued
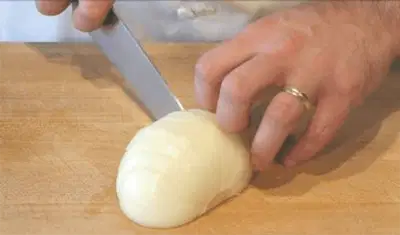
3.
Position the guiding hand as needed for
slicing. Slice the onion lengthwise by drawing
the knife backward instead of in the usual
forward motion.
TECHNIQUE:
Dicing Onions
16

Copyright Goodheart-Willcox Co., Inc. May not be posted to a publicly accessible website.
continued
3.
The slice should begin just short of the root
end of the onion so that the root end remains
intact. Do not cut through the root end core of
the onion either.
TECHNIQUE:
Dicing Onions
17

Copyright Goodheart-Willcox Co., Inc. May not be posted to a publicly accessible website.
continued
4.
Continue slicing until the onion has been
evenly sliced except for the small area on the
root end of the onion.
TECHNIQUE:
Dicing Onions
18

Copyright Goodheart-Willcox Co., Inc. May not be posted to a publicly accessible website.
continued
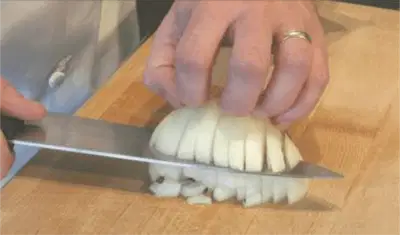
5.
Reposition the guiding hand so that it is
placed on top of the onion either with
fingertips curled under or with the palm of the
hand resting on top of the onion. Be sure that
the fingertips are up and out of harm’s way.
The knife blade will be parallel to the cutting
board to make the next slices.
TECHNIQUE:
Dicing Onions
19

Copyright Goodheart-Willcox Co., Inc. May not be posted to a publicly accessible website.
continued
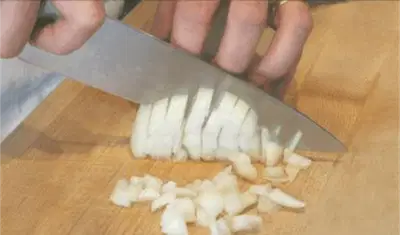
5.
Drawing the knife backward, cut slices that
are parallel to the cutting board. These slices
begin at the stem end and stop before cutting
through the root end.
TECHNIQUE:
Dicing Onions
20

Copyright Goodheart-Willcox Co., Inc. May not be posted to a publicly accessible website.
continued
6.
Reposition the guiding hand on the onion.
Slice the onion crosswise, perpendicular to
the previous cuts and beginning at the stem
end.
TECHNIQUE:
Dicing Onions
21

Copyright Goodheart-Willcox Co., Inc. May not be posted to a publicly accessible website.
6.
As the onion becomes difficult to hold safely,
lay it down on the cutting board. Cut this small
piece of onion into a dice by slicing and then
cutting across the slices.
7.
By changing the width of the cuts in steps 3,
4, and 5, you can adjust the size of the
finished dice.
TECHNIQUE:
Dicing Onions
22

Copyright Goodheart-Willcox Co., Inc. May not be posted to a publicly accessible website.
• Execute the techniques for mincing parsley.
Objective
23

Copyright Goodheart-Willcox Co., Inc. May not be posted to a publicly accessible website.
• Minced parsley is often sprinkled on food as a
garnish or added to sauces, soups, stews, and dips
• Minced parsley can be wrung out to
– remove moisture
– make the parsley easy to sprinkle
– increase its shelf life
– prevent green color from discoloring other foods
Mincing Parsley
24

Copyright Goodheart-Willcox Co., Inc. May not be posted to a publicly accessible website.
continued
1.
Wash the parsley in cold water. Dry between
paper towels or in a salad spinner.
2.
Separate the parsley leaves from the stems.
TECHNIQUE:
Mincing Parsley
25

Copyright Goodheart-Willcox Co., Inc. May not be posted to a publicly accessible website.
continued
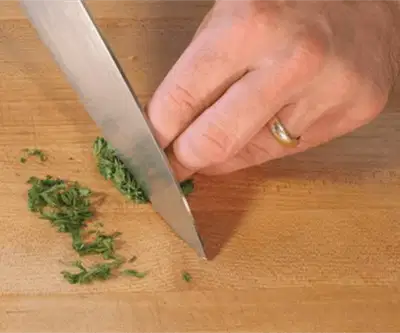
3.
Roll the leaves
into a tight ball.
Cut finely with a
chef’s knife.
4.
Mince the parsley
using the same
technique as for
garlic.
TECHNIQUE:
Mincing Parsley
26

Copyright Goodheart-Willcox Co., Inc. May not be posted to a publicly accessible website.
continued
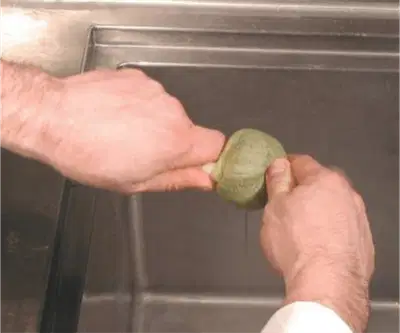
5.
To wring out the
parsley, place the
minced parsley in a
piece of cheesecloth.
Gather the ends of
the cheesecloth
together and twist the
cheesecloth tightly.
TECHNIQUE:
Mincing Parsley
27

Copyright Goodheart-Willcox Co., Inc. May not be posted to a publicly accessible website.
6.
Store parsley in a covered container in the
refrigerator until needed.
TECHNIQUE:
Mincing Parsley
28

Copyright Goodheart-Willcox Co., Inc. May not be posted to a publicly accessible website.
• Explain the chiffonade technique.
Objective
29

Copyright Goodheart-Willcox Co., Inc. May not be posted to a publicly accessible website.
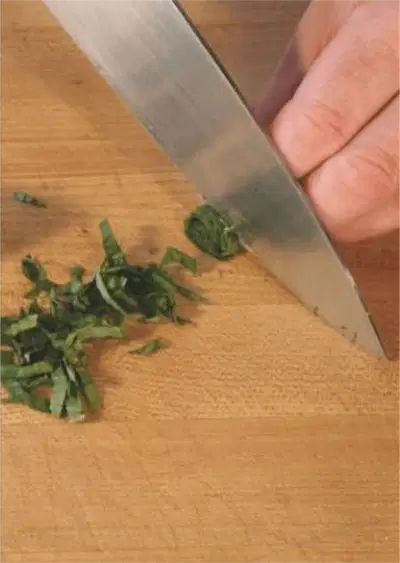
• Certain leafy vegetables
and fresh herbs can be
cut into a chiffonade
– Stack five to six leaves
– Tightly roll the stack
– Cut thin slices across the roll
– Unroll the cuts to reveal the
chiffonade
Chiffonade
30

Copyright Goodheart-Willcox Co., Inc. May not be posted to a publicly accessible website.
• Execute the techniques for preparing leeks.
Objective
31

Copyright Goodheart-Willcox Co., Inc. May not be posted to a publicly accessible website.
• Leeks are members of the onion family
• The white and light green portion of the leek is used
most often because it is more mild and tender
• The dark green leaves have a strong flavor and
tougher texture and are often used for stocks and
soups
Washing and Cutting Leeks
32

Copyright Goodheart-Willcox Co., Inc. May not be posted to a publicly accessible website.
continued
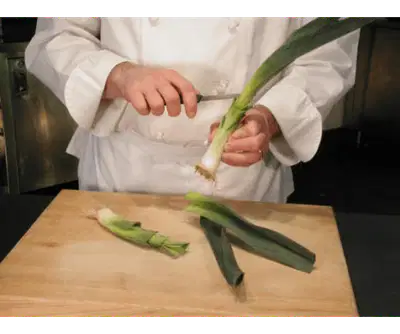
Trimming Leeks
1.
Remove the dark
green leaves one at
a time using a paring
knife. Only cut each
leaf where the dark
green begins.
2.
Trim the root end of
the leek.
TECHNIQUE:
Preparing Leeks
33

Copyright Goodheart-Willcox Co., Inc. May not be posted to a publicly accessible website.
continued
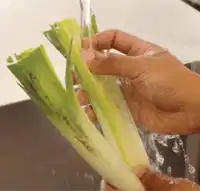
Washing Leeks
1.
Cut the leek in half lengthwise stopping short
of completely cutting through the root end. If
the leeks are very large, it may be necessary
to cut the leek lengthwise into quarters.
TECHNIQUE:
Preparing Leeks
34

Copyright Goodheart-Willcox Co., Inc. May not be posted to a publicly accessible website.
continued
2.
Place the leek, cut end
up, under cold running
water. Open the leek
as the water is running
on it. This removes the
dirt that is trapped
between the leaves.
TECHNIQUE:
Preparing Leeks
35

Copyright Goodheart-Willcox Co., Inc. May not be posted to a publicly accessible website.
continued
3.
After washing, verify that all the dirt has been
removed from between the leaves.
TECHNIQUE:
Preparing Leeks
36

Copyright Goodheart-Willcox Co., Inc. May not be posted to a publicly accessible website.
continued
Washing Chopped or Julienned Leeks
1.
Cut the leek completely in half lengthwise.
Cut the leeks according to the desired shape.
TECHNIQUE:
Preparing Leeks
37

Copyright Goodheart-Willcox Co., Inc. May not be posted to a publicly accessible website.
continued
2.
Place the cut leek in a large container of cold
water. Agitate the water so that the dirt is
loosened from the leeks. Let the leeks sit
undisturbed in the water for 10 to 15 minutes.
During this time, the dirt will settle to the
bottom of the container.
TECHNIQUE:
Preparing Leeks
38

Copyright Goodheart-Willcox Co., Inc. May not be posted to a publicly accessible website.
continued
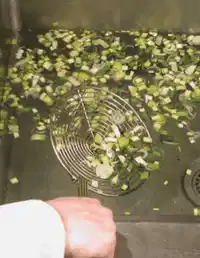
3.
Scoop the leeks off the top
of the water using a
spider. Do not agitate the
water any more than is
necessary. Never pour the
leeks and water into a
colander as this deposits
the dirt back on top of the
clean leeks.
TECHNIQUE:
Preparing Leeks
39

Copyright Goodheart-Willcox Co., Inc. May not be posted to a publicly accessible website.
4.
Verify that leeks are free from dirt before
using.
TECHNIQUE:
Preparing Leeks
40

Copyright Goodheart-Willcox Co., Inc. May not be posted to a publicly accessible website.
• Execute the techniques for peeling, seeding,
and dicing tomatoes.
Objective
41

Copyright Goodheart-Willcox Co., Inc. May not be posted to a publicly accessible website.
• Professional chefs must know how to peel, seed,
and dice tomatoes
• Peeling tomatoes requires a special technique
• There are two techniques for dicing tomatoes
– concassé
– fine dice
Peeling, Seeding, and Dicing
Tomatoes
42

Copyright Goodheart-Willcox Co., Inc. May not be posted to a publicly accessible website.
continued
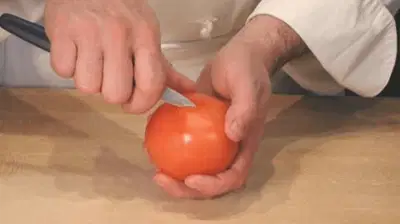
1.
Remove the tomato’s core using the tip of the
paring knife. Cut an “X” through the skin of
the opposite end of the tomato.
TECHNIQUE:
Peeling Tomatoes
43

Copyright Goodheart-Willcox Co., Inc. May not be posted to a publicly accessible website.
continued
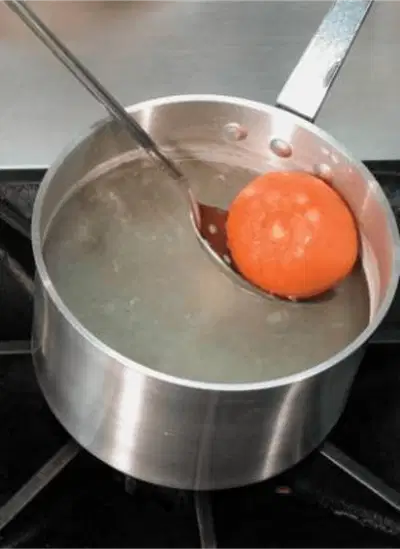
2.
Plunge the tomatoes in
boiling water for 30
seconds. Scoop the
tomatoes from the
boiling water using a
spider or pair of tongs
and place them in ice
water.
TECHNIQUE:
Peeling Tomatoes
44

Copyright Goodheart-Willcox Co., Inc. May not be posted to a publicly accessible website.
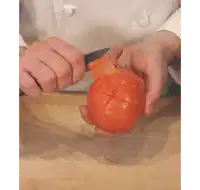
3.
When the tomatoes are cold,
remove them from the ice
water. Using a paring knife, pull
the skin from the tomato by
grabbing the skin where the “X”
was initially cut in the tomato. If
the skin of the tomato does not
come off easily, repeat step 2.
This may be necessary if the
tomatoes are not ripe.
TECHNIQUE:
Peeling Tomatoes
45

Copyright Goodheart-Willcox Co., Inc. May not be posted to a publicly accessible website.
continued
1.
Cut the tomato (most often tomatoes are
peeled first) in half. Do not cut through the
core, but rather through the middle of the
tomato.
TECHNIQUE:
Seeding Tomatoes
46


Copyright Goodheart-Willcox Co., Inc. May not be posted to a publicly accessible website.
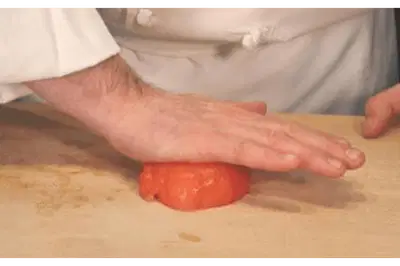
2.
Squeeze the
tomatoes gently so
as to push seeds
and excess moisture
from the tomatoes.
Inspect each tomato
half to be sure that
the seeds have all
been removed.
TECHNIQUE:
Seeding Tomatoes
47

Copyright Goodheart-Willcox Co., Inc. May not be posted to a publicly accessible website.
continued
Technique 1:
Concassé
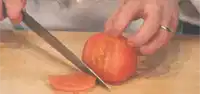
1.
Flatten a peeled and
seeded tomato half
slightly with the palm
of the hand.
2.
Cut into strips and
then a dice using a
chef knife.
TECHNIQUE:
Dicing Tomatoes
48

Copyright Goodheart-Willcox Co., Inc. May not be posted to a publicly accessible website.
continued
Technique 2: Fine Dice
1.
Using a small knife, trim the flesh from a
tomato that has been peeled but not seeded.
As the flesh is trimmed off, the seeds should
remain inside the tomato.
TECHNIQUE:
Dicing Tomatoes
49

Copyright Goodheart-Willcox Co., Inc. May not be posted to a publicly accessible website.
2.
Cut each of these trimmed pieces into strips
and then dice. The center of the tomato can
be seeded and cut into a concassé.
TECHNIQUE:
Dicing Tomatoes
50

Copyright Goodheart-Willcox Co., Inc. May not be posted to a publicly accessible website.
• Execute the techniques for peeling and mincing
garlic.
Objective
51

Copyright Goodheart-Willcox Co., Inc. May not be posted to a publicly accessible website.
• The flavor of garlic varies depending on the
preparation method
– intense flavor when raw
– mild when cooked
– sweet when roasted
• Garlic is one of the most common flavorings in
foodservice
Peeling and Mincing Garlic
52

Copyright Goodheart-Willcox Co., Inc. May not be posted to a publicly accessible website.
continued
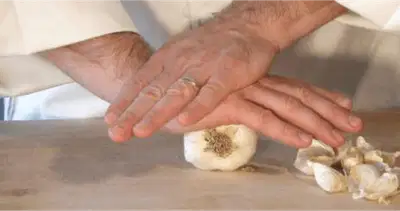
1.
Place the head of garlic on its side on a
cutting board. Position the palm of your hand
on the head of garlic. Press firmly until the
head breaks apart into individual cloves.
TECHNIQUE:
Peeling and Mincing Garlic
53

Copyright Goodheart-Willcox Co., Inc. May not be posted to a publicly accessible website.
continued
2.
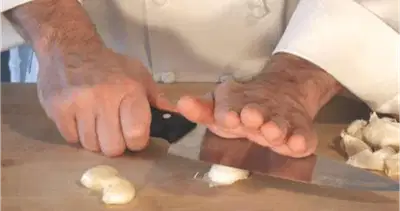
To peel the garlic, place a clove on the cutting
board. Place the side of a chef’s knife on the
clove. Press firmly on the knife until the clove
breaks.
TECHNIQUE:
Peeling and Mincing Garlic
54

Copyright Goodheart-Willcox Co., Inc. May not be posted to a publicly accessible website.
continued
2.
It may be necessary to tap the side of the
knife with the guiding hand. Remove the
loosened skin from each clove.
TECHNIQUE:
Peeling and Mincing Garlic
55

Copyright Goodheart-Willcox Co., Inc. May not be posted to a publicly accessible website.
continued
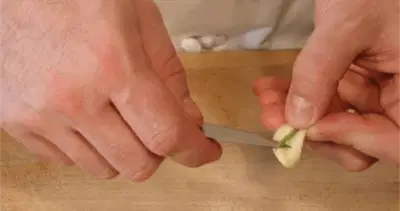
3.
Cut each clove in half and remove the germ if
it has a green tint. If not removed, the garlic
will taste bitter. Also, trim a small amount of
the root end of the garlic if brown.
TECHNIQUE:
Peeling and Mincing Garlic
56

Copyright Goodheart-Willcox Co., Inc. May not be posted to a publicly accessible website.
continued
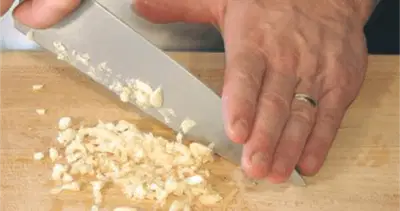
4.
To mince garlic, begin by coarsely chopping
the peeled cloves. The garlic is then minced
using the mincing technique.
TECHNIQUE:
Peeling and Mincing Garlic
57

Copyright Goodheart-Willcox Co., Inc. May not be posted to a publicly accessible website.
continued
5.
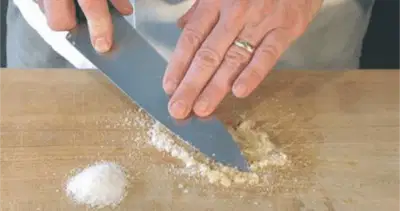
Some recipes call for garlic paste. To make a
paste, sprinkle the minced garlic with a pinch
of salt. The salt acts like an abrasive and
helps make the paste.
TECHNIQUE:
Peeling and Mincing Garlic
58

Copyright Goodheart-Willcox Co., Inc. May not be posted to a publicly accessible website.
5.
Using the side of the knife, reduce the garlic
to a paste by repeatedly dragging the knife
across the garlic.
TECHNIQUE:
Peeling and Mincing Garlic
59

Copyright Goodheart-Willcox Co., Inc. May not be posted to a publicly accessible website.
• Explain how to make clarified butter.
Objective
60

Copyright Goodheart-Willcox Co., Inc. May not be posted to a publicly accessible website.
continued
• Clarified butter is a
kitchen staple
• The butter’s water and
milk solids are removed
• Clarified butter is ideal for
higher temperature
cooking
Clarified Butter
61

Copyright Goodheart-Willcox Co., Inc. May not be posted to a publicly accessible website.
continued
1.
Place a metal container of butter in lightly
simmering water. As the butter melts, the water
and some of the milk solids sink to the bottom of
the container. The rest of the milk solids—in the
form of white foam—float.
Clarified Butter
62

Copyright Goodheart-Willcox Co., Inc. May not be posted to a publicly accessible website.
2.
When the butter is completely melted, skim the
foam off the top using a ladle.
3.
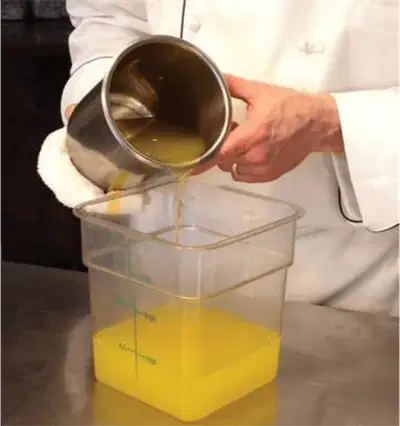
Gently lift the container of butter out of the water.
Carefully pour the fat from the container into
another container. Stop pouring when the water
becomes visible. Ladle any remaining fat from the
water’s surface.
Clarified Butter
63

Copyright Goodheart-Willcox Co., Inc. May not be posted to a publicly accessible website.
• Explain how to prepare mirepoix and its role in
the professional kitchen.
Objective
64

Copyright Goodheart-Willcox Co., Inc. May not be posted to a publicly accessible website.
continued
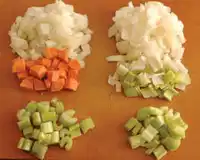
• Mirepoix (mir eh PWAH) is
used for making sauces,
stocks, soups, braises,
stews, and roasts
• White mirepoix is a
variation of mirepoix
Mirepoix
65

Copyright Goodheart-Willcox Co., Inc. May not be posted to a publicly accessible website.
• The “parts” in mirepoix refer to a weight
measurement
• The size of the mirepoix varies depending on how it
will be used
• The three vegetables should be cut to the same
size so pieces can cook evenly
Mirepoix
Show answer
Auto Play
Slide 1 / 65
SLIDE
Similar Resources on Wayground

61 questions
Copy of 11.3 America Moves Toward War
Presentation
•
9th - 12th Grade
60 questions
Cybersecurity Lesson 3-4
Presentation
•
6th - 8th Grade
65 questions
4.7 Inverse Trig Functions
Presentation
•
11th Grade
55 questions
Selection and care of clothing
Presentation
•
8th Grade
58 questions
Classroom Procedures
Presentation
•
10th Grade
58 questions
Unit 1 Lesson 1 8vo
Presentation
•
8th Grade
64 questions
Perpetual Inventory-2
Presentation
•
9th Grade
56 questions
CHRISTIANITY
Presentation
•
9th - 12th Grade
Popular Resources on Wayground
10 questions
Safety Day 2026 – Student Review

Quiz
•
9th Grade
21 questions
Continents and Oceans
Quiz
•
6th Grade
20 questions
Parts of Speech
Quiz
•
5th Grade
16 questions
Subject & Predicate
Quiz
•
5th Grade
25 questions
Multiplication Facts
Quiz
•
5th Grade
12 questions
Map Skills
Quiz
•
3rd Grade
22 questions
Continents and Oceans
Quiz
•
5th Grade
15 questions
Rounding Decimals
Quiz
•
5th Grade