Free Printable Movement at Joints Worksheets for Class 3
Discover Class 3 Biology worksheets focusing on Movement at Joints, featuring engaging printables and practice problems that help students understand how bones connect and move, complete with answer keys and free PDF downloads.
Explore printable Movement at Joints worksheets for Class 3
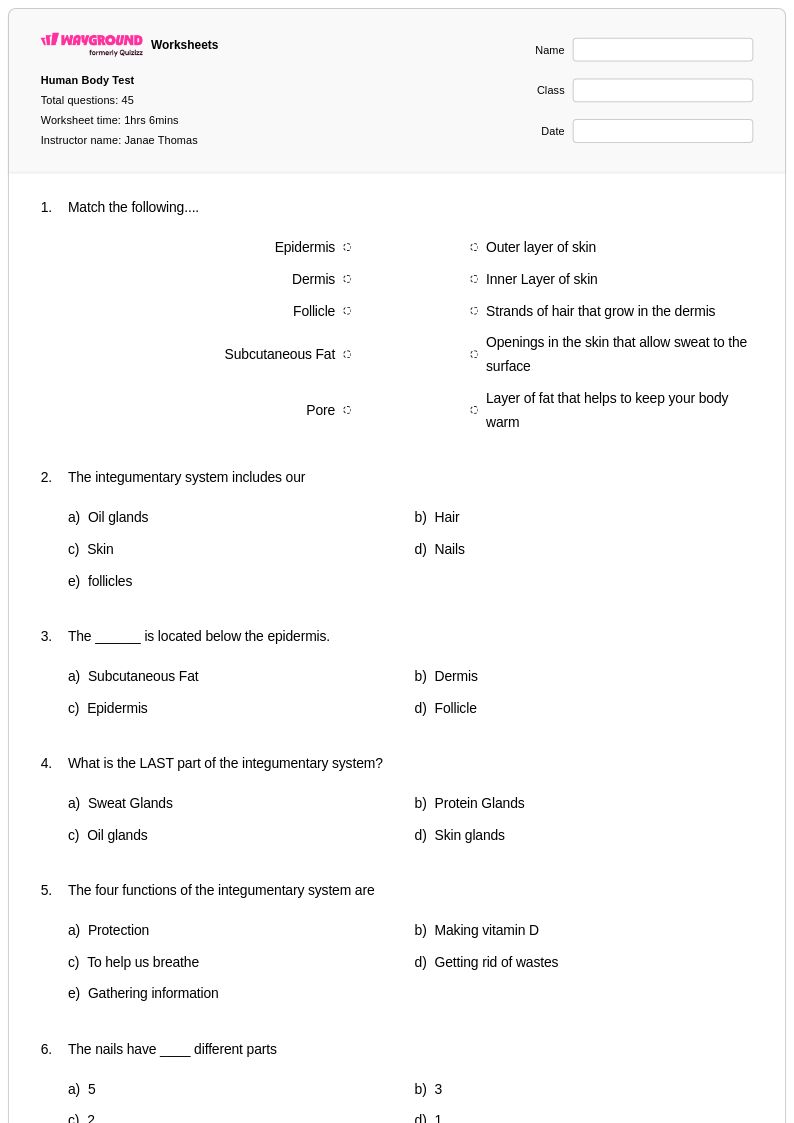
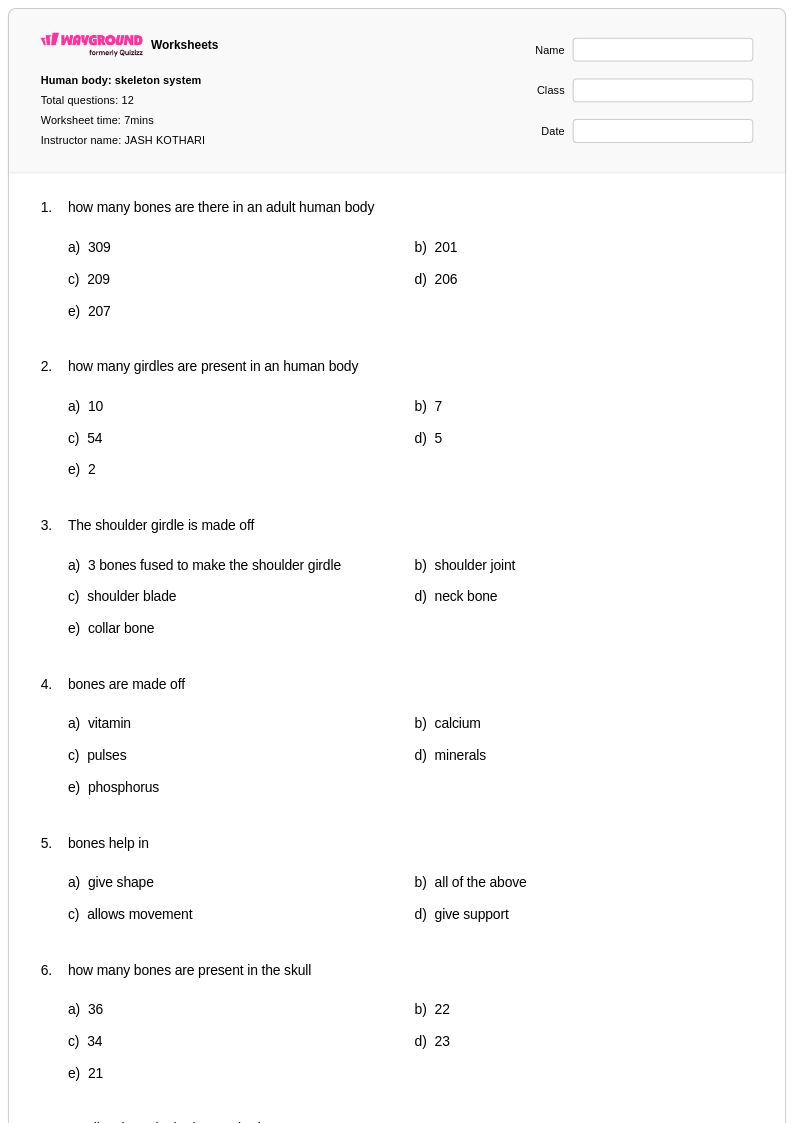
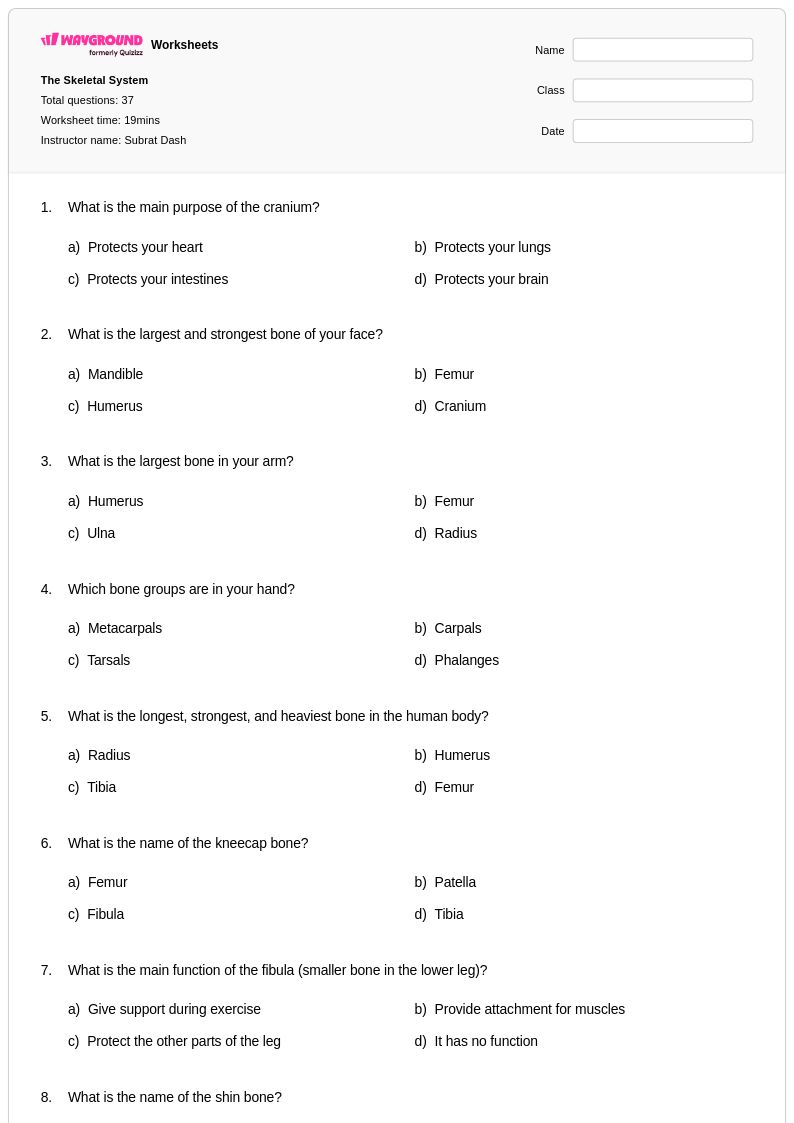
Movement at joints represents a fundamental concept in Class 3 biology education, and Wayground's comprehensive worksheet collection provides students with engaging opportunities to explore how the human body moves and functions. These carefully designed worksheets help young learners understand different types of joints, including hinge joints like knees and elbows, ball-and-socket joints like shoulders and hips, and pivot joints that allow rotation. Through interactive practice problems and visual exercises, students develop essential scientific observation skills while building their understanding of body mechanics. Each worksheet comes with a complete answer key to support independent learning, and the free printable format makes these resources easily accessible for classroom use, homework assignments, or additional practice sessions.
Wayground's platform empowers educators with millions of teacher-created resources specifically focused on movement at joints and related biology concepts for elementary students. The robust search and filtering capabilities allow teachers to quickly locate worksheets that align with curriculum standards and match their students' specific learning needs. These versatile materials are available in both digital and printable PDF formats, enabling seamless integration into diverse classroom environments and teaching styles. Teachers can customize worksheets to provide appropriate differentiation for struggling learners or advanced students, making these resources invaluable for lesson planning, targeted remediation, and skill enrichment activities that reinforce understanding of how joints enable movement throughout the human body.
FAQs
How do I teach movement at joints in a biology or anatomy class?
Start by establishing the three structural joint categories — synovial, cartilaginous, and fibrous — before introducing movement terminology like flexion, extension, abduction, adduction, rotation, and circumduction. Using physical demonstrations or having students move their own limbs while naming the action helps anchor abstract vocabulary to lived experience. From there, connecting joint structure to function (why a ball-and-socket joint allows circumduction while a hinge joint does not) builds the analytical thinking students need for assessments.
What exercises help students practice identifying types of movement at joints?
Effective practice activities include classification tasks where students match movement terms to labeled diagrams of the skeleton, as well as scenario-based problems asking students to identify which joint type and movement pattern are involved in a specific action like throwing a ball or bending the knee. Worksheets that ask students to connect antagonistic muscle pairs to their corresponding joint movements are especially valuable for reinforcing the muscular and skeletal system relationship. Repeated practice with answer keys allows students to self-correct and consolidate the terminology before formal assessment.
What mistakes do students commonly make when learning about joint movement?
One of the most frequent errors is confusing abduction and adduction — students often reverse the two, especially under test conditions. Students also commonly misclassify joint types by focusing on location rather than structure, for example assuming all limb joints are synovial without considering cartilaginous joints like the intervertebral discs. Another persistent misconception is treating flexion and extension as universal descriptors without recognizing that context matters, particularly at the ankle where the terminology shifts to plantarflexion and dorsiflexion.
How can I differentiate movement at joints worksheets for students with different learning needs?
For students who need additional support, reduce the number of answer choices on classification tasks to lower cognitive load and allow more time on timed activities. Wayground supports individual student accommodations including extended time per question, read-aloud functionality for students who benefit from hearing content, reduced answer choices, and adjustable font sizes and reading themes — all configurable per student without notifying the rest of the class. Higher-level learners can be challenged with open-ended prompts that require them to explain the relationship between joint structure and range of motion rather than simply labeling diagrams.
How do I use movement at joints worksheets effectively in my classroom?
These worksheets work well as guided practice following direct instruction on joint types and movement terminology, or as review tools before a unit assessment. Wayground's movement at joints worksheets are available as printable PDFs for traditional classroom use and in digital formats for technology-integrated environments, and teachers can also host them as a quiz directly on the Wayground platform. The included answer keys allow students to self-assess independently, freeing up class time for discussion of higher-order concepts like how injury or aging affects joint mobility.
How do I connect movement at joints to the broader musculoskeletal system?
Joint movement cannot be fully understood without teaching antagonistic muscle pairs — the concept that one muscle contracts while its opposing muscle relaxes to produce controlled movement at a joint. Linking specific joint types to the muscles that act on them (for example, the biceps and triceps acting on the hinge joint at the elbow) gives students a functional framework rather than isolated vocabulary. This integrated approach also prepares students for topics like injury biomechanics, rehabilitation, and sports science.