3PCD — Third-Party Cookie Deprecation: A Technical Deep Dive

The Changing Landscape of Web Cookies
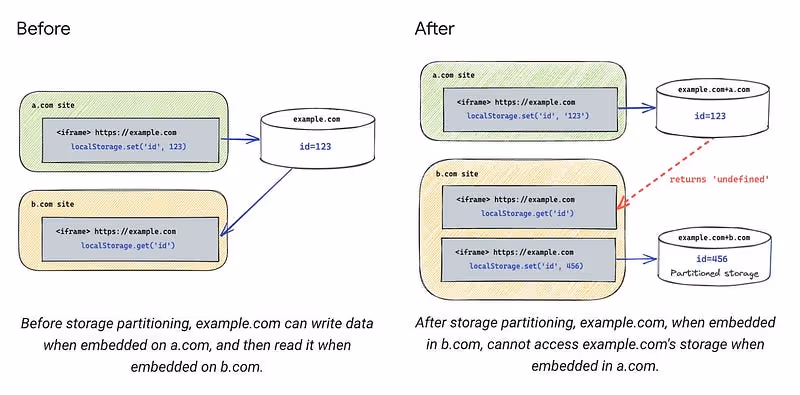
Web browsers, particularly Chrome are finally taking a stand to reshape how cross-site tracking and authentication work. Third-party cookies, once a ubiquitous method for maintaining user sessions across different domains, are being phased out due to privacy concerns. Most privacy focused browsers already sandbox the session data like Cookies, Storage APIs to within the origin domain. But with Chrome also set to enable this, it requires web applications to adopt more privacy-conscious approaches to user authentication and data management. Though the deadline for this deprecation is delayed until early 2025, it is already rolled-out to 1% of users and the exposure is set to increase to 100% by the time the deadline is finalized.
Just to give a quick rundown of how unregulated 3rd party cookies can jeopardize your privacy, here’s what can happen,
- You visited your favourite social media XYZ, it sets a cookie
- That same social media XYZ also sells Ads
- Now any other site that you visit, if it has XYZ ads/trackers/any kind of integration, that XYZ cookie will get sent
- This way XYZ keeps track of anything and everything you do.

I’m sure nobody wants that to happen, so 3PCD is definitely a need to avoid this from happening, but the collateral damage for doing that is benevolent actors who use 3rd party cookies for legitimate use cases.
Quizizz is one of those, where the content embedded in 3rd party websites is a critical use case for us, so we decided to pre-empt and prepare for this deprecation well ahead of the timeline. While there are many approaches to handle this deprecation, we decided to implement CHIPS and use Storage Access APIs to enable our integrations to work seamlessly in a 3rd party context.
CHIPS: Cookies with Independent Partitioned States
What is CHIPS?
Cookies Having Independent Partitioned States (CHIPS) is a browser mechanism that isolates cookies for different top-level sites. Think of it like creating separate, secure compartments for cookies from different websites, preventing cross-site tracking while maintaining necessary functionality. This would ensure there are separate cookie jars for each origin and 3rd party domain combinations so that there is no cross site cookie access. The following is a simplified implementation of how to set CHIPS from the backend.
Core Implementation
public generatePartitionedCookie(response, params) {
  const { userId, domain, expiresIn = 86400 } = params;

  // Generate your session cookie value here
  const cookieValue = this.generateSecureToken(userId);

  // Create a CHIPS-compatible cookie configuration
  return response.cookie({
    name: 'quizizz_session_id',
    value: cookieValue,
    domain,
    maxAge: expiresIn,
    sameSite: 'none',  // Allows cross-site access
    secure: true,      // HTTPS only
    partitioned: true  // Enable CHIPS
  });
}
Advantages
- Prevents cross-site tracking
- Maintains session continuity for a given origin and 3rd party domain combination
- Provides granular control over which context the cookie is stored
- Enhances user privacy
Storage Access API: Explicit Cross-Site Permission
Understanding the Storage Access API
The Storage Access API provides a transparent mechanism for websites to request explicit permission to access storage across different domains. Unlike traditional third-party cookies, this approach gives users more control and visibility into how their data is accessed.
Implementation Strategy
class StorageAccessManager {
  public async requestStorageAccess(): Promise<boolean> {
    try {
      // Check API availability
      if (!document.hasStorageAccess) {
        return false;
      }

      // Request cross-site storage access
      const accessGranted = await document.requestStorageAccess({
        types: ['cookies', 'localStorage', 'sessionStorage']
      });

      return accessGranted;
    } catch (error) {
      // Handle access request failures
      return false;
    }
  }
}
This provides an explicit consent mechanism where the user can decide to choose to give access to cross site data. In most cases, critical information wouldn’t be kept in browser storage but accessing these stores when consent is not given is a problem as it will throw an error like below,
Access to localStorage failed: SecurityError: Failed to read the 'localStorage'property from 'Window': Access is denied for this document.
Alternative Approaches to Cross-Site Authentication and Storage access
While Quizizz has primarily implemented CHIPS, several alternative strategies exist for managing cross-site authentication and storage in the era of third-party cookie deprecation.
1. Token based authentication
Token-based authentication is a common way to overcome third-party cookie deprecation (3PCD) restrictions, particularly in web applications that rely on being able to access inside a 3rd party context. Here’s a concise explanation of how it would work
- Token Issuance:
- The authentication server validates the user provided credentials.
- If valid, it generates a JSON Web Token (JWT) or other token types (e.g., OAuth access token) and sends it back to the client in the response.
- The client stores the token securely, typically in:
- LocalStorage (persists across tabs but is prone to XSS).
- SessionStorage (limited to the tab but less persistent).
- In-Memory (best against XSS but cleared on refresh).
- For each subsequent request to a protected resource, the client includes the token in the Authorization header
import * as jwt from 'jsonwebtoken';
import * as crypto from 'crypto';

class SimpleJWT {
  private readonly SECRET_KEY;
  private readonly ISSUER: string = 'quizizz.com';

  constructor() {
    // Use a secure key for production instead
    this.SECRET_KEY = crypto.randomBytes(64).toString('hex');
  }

  public generateCrossDomainToken(options) {
    const { userId, userRole, domains } = options;

    return jwt.sign({
      sub: userId,           // Subject (user identifier)
      role: userRole,        // User role/permissions
      aud: domains,          // Intended audience (domains)
      iss: this.ISSUER,      // Token issuer
      exp: this.getExpiration(), // Expiration time
      iat: Date.now(),       // Issued at time
      jti: this.generateJTI() // Unique token identifier
    }, this.SECRET_KEY, {
      algorithm: 'HS256'
    });
  }
}
Along with a custom authentication implementation, we can also leverage OpenID Connect (OIDC) which provides a cookie-free, token-based approach to user authentication. It relies on OAuth 2.0 to handle secure token exchange, enabling applications to authenticate users without relying on third-party cookies.
Here’s how you can integrate your application with Google OIDC
const { Issuer } = require('openid-client');

// Discover the OIDC provider's configuration
Issuer.discover('https://accounts.google.com')
  .then((googleIssuer) => {
    const client = new googleIssuer.Client({
      client_id: 'YOUR_CLIENT_ID',
      client_secret: 'YOUR_CLIENT_SECRET',
      redirect_uris: ['http://localhost:3000/callback'],
      response_types: ['code'],
    });

    // Redirect users to the authorization URL
    const authUrl = client.authorizationUrl({
      scope: 'openid email profile',
    });

    // Exchange the authorization code for tokens
    app.get('/callback', async (req, res) => {
      const params = client.callbackParams(req);
      const tokenSet = await client.callback(
        'http://localhost:3000/callback',
        params
      );

      console.log('Tokens received:', tokenSet);

      const userInfo = await client.userinfo(tokenSet.access_token);

      res.send('Authentication successful');
    });
  })
  .catch((err) => console.error('Error with OIDC setup:', err));
Similar to google, we can use any OIDC identity providers like Microsoft, Okta, Auth0 etc., we can refer to all available certified OIDC implementations here.
On top of OIDC being a tested standard for authentication, once we’ve added support for authenticating users through OIDC in an application, it makes it trivial to support more SSOs going forward.
2. Federated Identity Management (FedCM)
FedCM is a privacy-preserving alternative to third-party cookies that enables federated identity login flows without relying on cross-site cookies. It facilitates authentication through identity providers (IdPs) while adhering to modern web privacy standards.
How FedCM Overcomes 3PCD Restrictions
- No third-party cookies: It uses browser-mediated communication between Relying Parties (RPs) and IdPs.
- User consent: The browser ensures that users are aware of and consent to sharing their identity.
- Reduced tracking: Only essential data is shared, minimizing potential user tracking across sites.
Basic Workflow
- User initiates login on the Relying Party (RP) website.
- RP requests identity from the browser using FedCM.
- Browser contacts the IdP to fetch identity information.
- Users consent to sharing their identity.
- IdP returns a token (e.g., OpenID token).
- RP verifies the token and logs in the user.
1. Client-Side: Request Identity
The RP (your web app) initiates the authentication flow using the FedCM API.
async function loginWithIdentityProvider() {
  try {
    const result = await navigator.identity.get({
      provider: 'https://idp.example.com',
      // Optional: Specify a nonce for additional security
      nonce: 'random-string-for-verification',
    });

    if (result) {
      // Send the token to your server for verification
      await fetch('/api/auth/callback', {
        method: 'POST',
        headers: {
          'Content-Type': 'application/json',
        },
        body: JSON.stringify({ token: result.token }),
      });

      console.log('User successfully logged in.');
    }
  } catch (error) {
    console.error('Login failed:', error);
  }
}
2. IdP Implementation
The identity provider serves a configuration endpoint for the browser and handles authentication.
- /.well-known/fedcm.json (IdP metadata configuration):
{
  "id_assertion_endpoint": "https://idp.example.com/assertion",
  "accounts_endpoint": "https://idp.example.com/accounts",
  "branding": {
    "background_color": "#FFFFFF",
    "icon_url": "https://idp.example.com/logo.png"
  }
}
- an Endpoint for identity assertion
app.post('/assertion', (req, res) => {
  const { clientId, nonce } = req.body;

  // Validate client and nonce, then issue a token
  const token = generateOpenIDToken({
    sub: 'user123',
    aud: clientId,
    nonce,
  });

  res.json({ token });
});
3. Server-Side: Validate Token
The RP’s backend validates the token received from the client.
const jwt = require('jsonwebtoken');

app.post('/api/auth/callback', (req, res) => {
  const { token } = req.body;

  try {
    const decoded = jwt.verify(token, 'your-public-key', {
      audience: 'your-client-id',
      issuer: 'https://idp.example.com',
    });

    // User is authenticated
    req.session.user = decoded.sub;

    res.status(200).json({ message: 'Login successful' });
  } catch (error) {
    res.status(401).json({ error: 'Invalid token' });
  }
});
Key Benefits of FedCM
- User privacy: Reduces tracking by limiting shared information.
- Improved UX: Native browser consent flow simplifies login.
- No reliance on third-party cookies: Secure and privacy-focused federated login.
Limited Support
FedCM is still under development and adoption. It works in Chromium-based browsers with certain flags enabled (chrome://flags/#fedcm). But other major browsers like Firefox and Safari do not support it.
3. Related Website sets
Related Website Sets is a privacy-preserving mechanism introduced by Google to help websites that are part of the same organizational group maintain cross-site functionality after third-party cookies are phased out. Think of it like a family pass for websites owned by the same company.
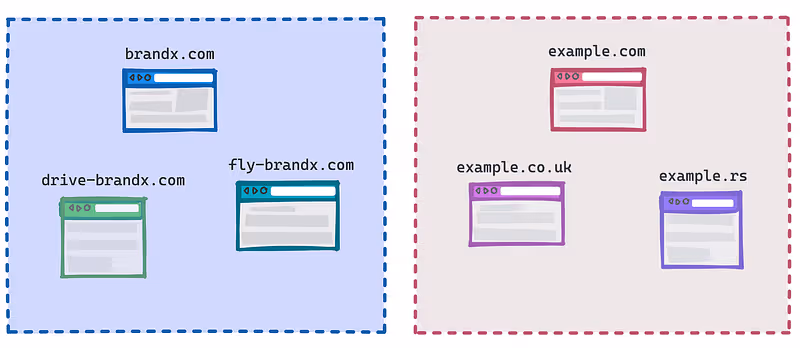
Key Concepts:
- Allows a set of related websites to share limited cross-site access
- Helps maintain functionality for sites with related domains
- Requires explicit declaration and verification by site owners
Here’s a practical example to illustrate how to implement Related Website Sets:
// Registering a Related Website Set
async function registerRelatedWebsiteSet() {
  if ('relatedWebsites' in navigator) {
    try {
      // Declare primary site and associated sites
      const registrationResult = await navigator.relatedWebsites.register({
        primary: 'https://main-site.com',
        associatedSites: [
          'https://analytics.main-site.com',
          'https://payments.main-site.com',
        ]
      });

// Check registration status
      if (registrationResult.status === 'success') {
        console.log('Related Website Set registered successfully');
      }
    } catch (error) {
      console.error('Related Website Set registration failed:', error);
    }
  }
}

// Check if a site is part of a Related Website Set
async function checkRelatedWebsiteSet() {
  if ('relatedWebsites' in navigator) {
    const isRelated = await navigator.relatedWebsites.isRelatedWebsite();
    console.log('Is this site part of a Related Website Set?', isRelated);
  }
}
Implementation Steps:
- Site owners must declare their Related Website Set through Google Search Console by hosting a file at /.well-known/related-website-set.json similar to the following under your main domain,
{
  "primary": "https://main-site.com",
  "associatedSites": ["https://analytics.main-site.com", "https://payments.main-site.com"],
  "description": "Example Related Websites"
}
2. Websites must meet specific criteria (same organization, related purpose)
3. Use the navigator.relatedWebsites API to register and check set membership
Limitations:
- Limited to a maximum of 5 associated sites
- Requires explicit registration and verification
- Not a complete replacement for third-party cookies
Quick Compatibility Testing
Follow these steps to quickly see if your web application is compatible with the guidelines or not. Run these diagnostics when your web application loads inside an iFrame or is embedded within another website.
1. Simulate Third-Party Cookie Restrictions
Use Chrome’s built-in flags to simulate third-party cookie restrictions, you can also find the same flag if you visit chrome://flags
# Chrome launch command with third-party cookies blockedgoogle-chrome --disable-third-party-cookies
2. Basic Compatibility Diagnostic Script
function diagnoseThirdPartyCookieImpact() {
  try {
    document.hasStorageAccess().then((hasAccess) => {
      if (hasAccess) {
    	// storage access has been granted already.
      } else {
    	// storage access hasn't been granted already;
    	// you may want to call requestStorageAccess().
      }
    });
  } catch (error) {
    console.error('Cookie storage test failed', error);
  }
}

window.addEventListener('load', diagnoseThirdPartyCookieImpact);
Conclusion
Adhering to third-party cookie deprecation guidelines requires a thorough examination of cookie and storage usage of web applications. By implementing one of these authentication strategies, platforms can ensure they maintain a predictable user experience across different domains.