Free Printable Parts of the Light Microscope Worksheets for Class 7
Class 7 biology students can explore light microscope components with Wayground's comprehensive collection of free worksheets and printables, featuring detailed practice problems and answer keys to master microscope parts identification.
Explore printable Parts of the Light Microscope worksheets for Class 7
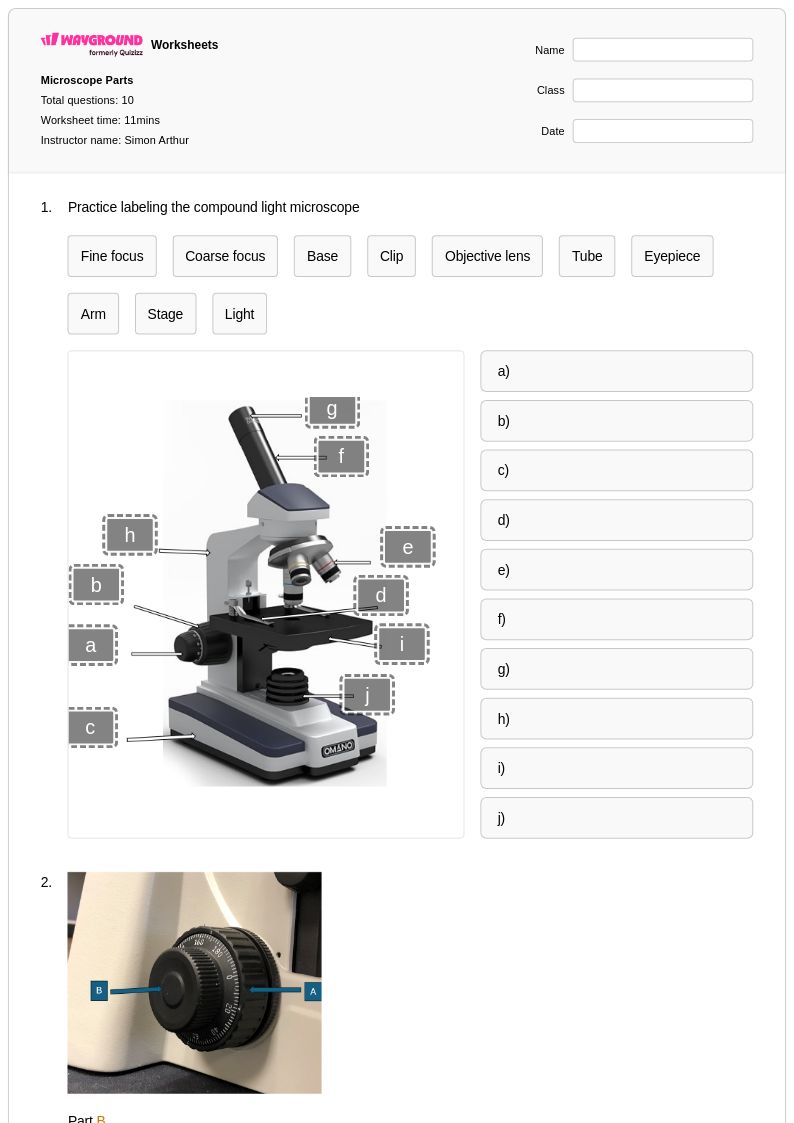
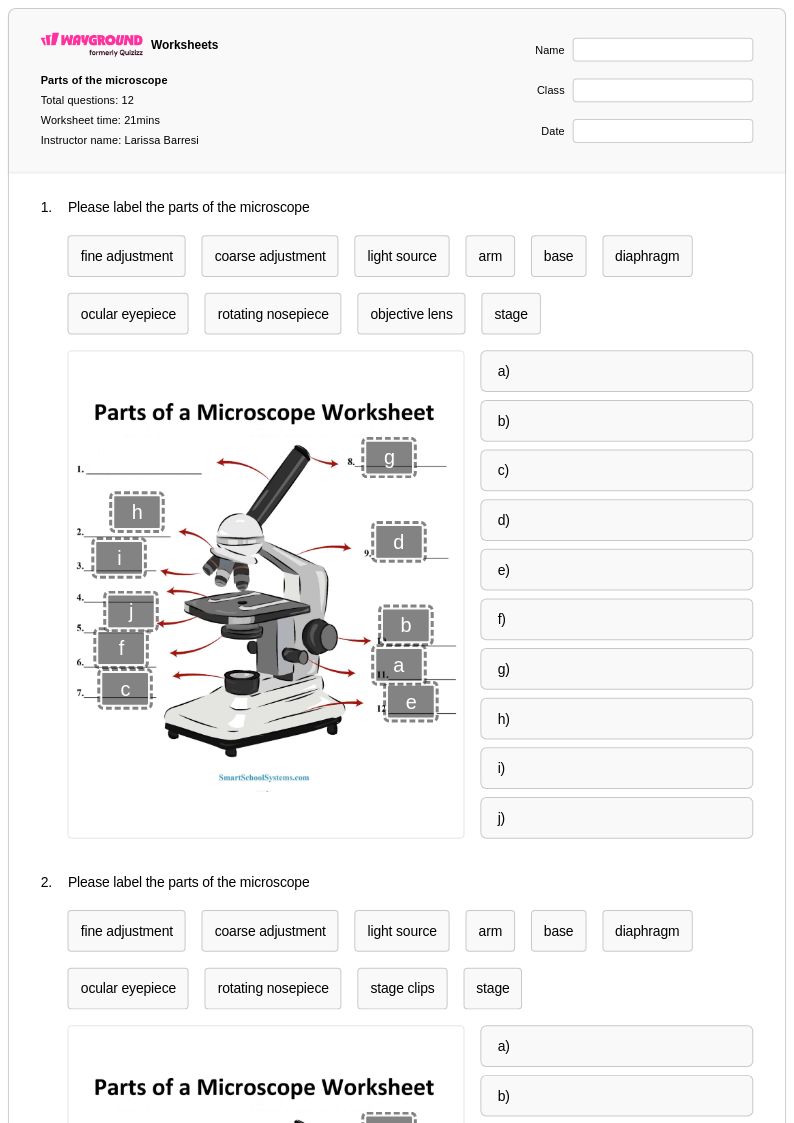
Parts of the Light Microscope worksheets for Class 7 students available through Wayground (formerly Quizizz) provide comprehensive practice in identifying and understanding the essential components of this fundamental scientific instrument. These expertly crafted resources strengthen students' ability to recognize key microscope parts including the eyepiece, objective lenses, stage, diaphragm, and focusing knobs, while developing their understanding of how each component contributes to magnification and image clarity. The collection features detailed labeling exercises, function-matching activities, and practice problems that reinforce proper microscope terminology and operational principles. Students benefit from immediate feedback through integrated answer keys, and teachers can access these valuable printables as free pdf downloads that support both classroom instruction and independent study.
Wayground (formerly Quizizz) empowers educators with millions of teacher-created resources specifically designed for microscopy instruction, featuring robust search and filtering capabilities that allow quick identification of grade-appropriate materials aligned with science standards. The platform's differentiation tools enable teachers to customize worksheets based on individual student needs, whether for remediation of basic microscope vocabulary or enrichment activities exploring advanced optical principles. These flexible resources are available in both printable and digital formats, including downloadable pdf versions that facilitate seamless integration into lesson plans, homework assignments, and laboratory preparation activities. The comprehensive collection supports effective instructional planning by providing varied practice opportunities that help students master microscope literacy—a critical foundation skill for all future biological investigations and scientific inquiry.
FAQs
How do I teach parts of the light microscope to biology students?
Start by introducing the microscope as a system of interdependent parts, grouping components by function — optical (eyepiece, objective lenses), mechanical (stage, coarse and fine adjustment knobs), and illumination (condenser, diaphragm, light source). Use a physical or projected diagram for initial labeling, then have students trace the light path from the illumination system through the condenser and diaphragm, through the specimen on the stage, and up through the objective and eyepiece. Connecting each part to its specific function helps students move beyond rote memorization toward genuine conceptual understanding.
What exercises help students practice identifying microscope parts?
Labeling diagrams is the most effective starting point, requiring students to identify components like the eyepiece, objective lenses, stage, diaphragm, condenser, and adjustment knobs on a blank or partially labeled image. Function-matching activities that pair each component to its specific role deepen understanding beyond visual recognition. Combining both exercise types in a single worksheet session reinforces both identification and purpose, which mirrors the kind of thinking students need during actual lab work.
What mistakes do students commonly make when learning microscope parts?
Students frequently confuse the coarse and fine adjustment knobs, not understanding that the coarse knob is used only at low magnification and the fine knob is used for precise focusing at higher magnifications. Another common error is conflating the condenser and diaphragm — both affect light, but the condenser focuses it while the diaphragm controls the amount entering the specimen. Students also tend to mislabel the nosepiece as part of the objective lens system rather than as the rotating mount that holds multiple objective lenses.
How can I differentiate microscope parts instruction for students at different levels?
For beginning students, focus on the core structural components — eyepiece, objective lenses, stage, and adjustment knobs — using labeled diagrams and straightforward identification tasks. More experienced learners can be challenged with function-analysis questions that require explaining how components like the diaphragm and condenser work together to control image clarity and contrast. On Wayground, teachers can also apply accommodations such as reduced answer choices for students who need additional support, or read-aloud features for students with reading barriers, without disrupting the experience for the rest of the class.
How do I use Wayground's parts of the light microscope worksheets in my classroom?
Wayground's microscope parts worksheets are available as printable PDFs for traditional classroom distribution and in digital formats for technology-integrated or remote learning environments, and can also be hosted as a quiz directly on the Wayground platform. Each worksheet includes a comprehensive answer key, which reduces prep time and makes them practical for both in-class practice and independent homework assignments. Teachers can use the platform's search and filtering tools to quickly locate resources that match their current unit focus, whether that's basic component identification or more advanced function analysis.
How do I help students understand the function of the diaphragm and condenser on a light microscope?
Explain that the condenser gathers and focuses light onto the specimen from below the stage, while the diaphragm — typically an iris diaphragm built into the condenser — controls how much of that light actually passes through. A useful analogy is a flashlight (condenser) with an adjustable aperture ring (diaphragm): the flashlight directs the beam, while the aperture narrows or widens it. Students understand this distinction better when they physically adjust the diaphragm during lab and observe the change in image contrast and brightness firsthand.